Map explorer camera
The map for the game is going to be larger than the screen, meaning we need a way to draw different locations on the screen. We can achieve this by creating a virtual camera to help simplify this operation.
Drawing with the camera
We have two options if we want to map a large map onto a small part of the screen. Firstly, we could reposition everything manually as we move around changing the world to make sure that the right part appears on the screen. Alternatively, we can draw the world through a virtual camera that adjusts the part that appears on the screen.

The above image shows the two options. In the first case, we keep retain the current screen coordinates. The top left of the screen stays at 0,0, and we move all the tiles so that they appear on the screen in the right location.
This seems like a lot of work, because it is. Moving the world to position it on the screen isn’t going to be the right way to approach this. Instead, we can introduce a camera that allows us to pretend that we move the coordinates of the screen. This is shown in the option on the right of the image. Here, the world stays where it is, and we move the position of the screen so that it appears in the right place.
In reality the screen coordinates will still start at 0,0, but by adding a virtual camera we can adjust each drawing operation as it is performed. If we move the camera so that the top left is at 10,15 then when we draw at 15,30 it will be adjusted to be at 5, 15.
Let’s consider this one dimension at a time. If the top left of the screen is at x = 10, then drawing at x = 15 will need to be 5 pixels from the left of the screen. If we move the camera to be at x = 15, then this same drawing operation will result in the shape appearing 0 pixels from the left of the screen. Move the camera again to x = 20, and now the shape is off the left of the screen by 5 pixels, having a screen location of x = -5.
As a result of this change, we have two sets of coordinates. World coordinates and screen coordinates. The tiles in the map will be our world coordinates, and the screen coordinates are calculated by subtracting the location of the camera from the respective world coordinate. So, as we saw, when the camera is at x = 10, then drawing a world coordinate of x = 15 will appear at 15 - 10 = 5.
The Camera in SplashKit
You can implement your own camera if you want, but SplashKit already provides this functionality. Each time you draw, it will adjust the location of the drawing operation based on the position of the camera in SplashKit.
| Function/Procedure | Required Arguments | Description |
|---|---|---|
set_camera_position | a point_2d value | Moves the camera so that the provided point is the new value for the top left of the screen. |
camera_x | none, returns a double | Returns the x location of the camera. |
camera_y | none, returns a double | Returns the y location of the camera. |
option_to_screen | none, returns a drawing_options value | Allows you to tell SplashKit to ignore the camera for a drawing operation. |
point_at | an x and y value, returns a point_2d value | Returns a point_2d value that has the x and y set to the values provided. |
To implement the camera in the map explorer you will need to do the following:
-
Add a
camera_positionfield to theexplorer_data. -
Initialise the
camera_positionto the point at 0,0 -
Update
draw_explorerto:- Use
set_camera_positionto move the camera to the point from thecamera_positionin theexplorer_data. - Ignore the camera when drawing the editor details, and prompt text. For example
fill_rectangle(color_white(), 0, 0, TILE_WIDTH + 10, TILE_HEIGHT + 18, option_to_screen());//...draw_text("Editor", color_black(), 0, 0, option_to_screen()); - Use
-
Update
handle_inputto move the camera by changing the data incamera_position.
Compile and run this and then explore the map. It looks like you are moving the map around on the screen, but we know we are really just moving where things are drawn.
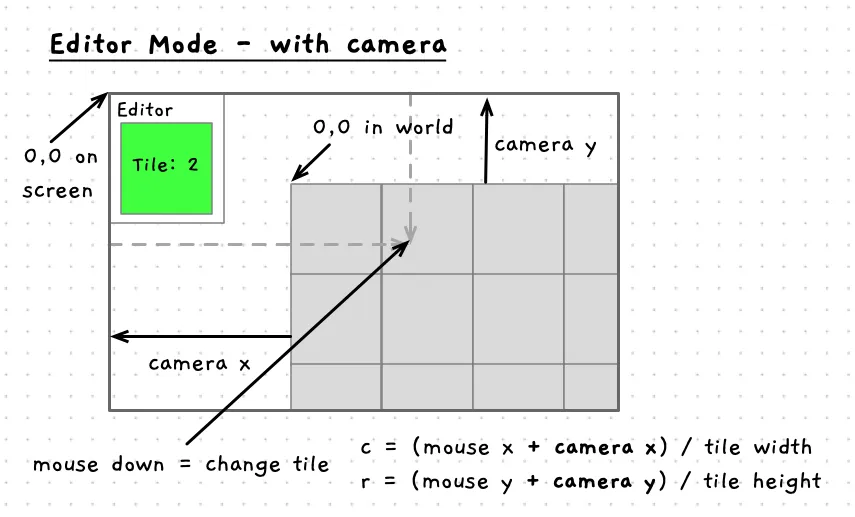
Now try editing. We need to fix up the editor so that it takes the camera into consideration when we are clicking. To do this, we need to reverse the action performed by the camera. When we draw, the camera takes a world coordinate, subtracts the camera.x/y value to get a screen coordinate. Now we need to take a screen coordinate (the mouse location) and add the camera.x/y value to get the world coordinate. This is shown in the following image.

Notice how the location of the map’s origin is offset by the camera values. We need to add these back to the screen coordinates to determine where in the world the user has clicked.
Go ahead and make the changes necessary to fix the editor:
- Update the
handle_edit_inputto find where you have clicked in the world.
Compile and run to make sure that the editor is all working again.
In this section we have seen how to map between two sets of array indexes. Allowing us to adjust how things are positioned by introducing a virtual camera.
Only draw visible tiles
One thing you may have wondered is the impact of drawing all the tiles, when only some appear on the screen. We should be able to optimise this by only drawing the tiles that are actually on the screen. Let’s see how to do that next.
If we think about a really large map, most of it will not be drawn to the screen. At the moment, our code loops over all tiles in the map even though only some will actually appear. This is wasted effort which we can avoid.
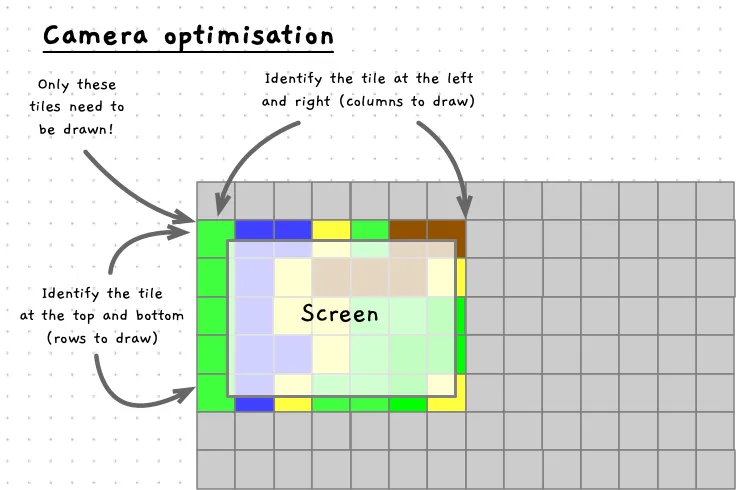
The following image gives some ideas on how we can optimise this. Rather than looping from the first to last column and then the first to last row, we can loop over only a part of these. We need to identify the first column that will appear on the screen and the last column to appear, as the same with the rows. Then you can adjust the loop to only access tiles at these values. This will improve performance by reducing wasted effort.

To identify the first column, we can use the same screen-to-world mapping we did for the editor. In this case we need to know the column that appears at the x = 0. This will be the first column. The last column will be the column at x = SCREEN_WIDTH. These values can be saved in start_col and end_col or similar local variables. Then your for loop can iterate from c = start_col, while c <= end_col.
void draw_map(const map_data &map, const point_2d &camera){  int start_col = camera.x / TILE_WIDTH;  int end_col = (camera.x + screen_width()) / TILE_WIDTH + 1;  //...
  for(int c = start_col; c < end_col; c++)  {    //...  }}
Have a go at coding this up and make sure you can still see all the tiles on the screen.
Boundary Checks
If you haven’t already noticed an issue, try navigating to see the areas outside map. You should see tiles drawing, though the program will also crash if you explore this too far.
What is happening here?
Previously we were always drawing all the tile, whereas now we are calculating which rows and columns to draw. This is all good, but it is possible for the user to move so that they are seeing “rows” and “columns” that are outside the map itself!
For example, at the start of the program the map is showing column 0 on the left edge of the screen. If you move further to the left, then the code will now try to draw column -1, which does not exist. The same occurs if you move up, with the code trying to draw negative rows. Moving right and down, it is possible to go past the number of rows or columns in the map. As with the negative indexes, these do not exist in the map.
So what is being accessed?
Array access in C/C++ is based on the distance from the first element. If you access a negative index, then the compiler does not stop you (what were they thinking!) it just accesses data that appears in memory before the array declaration. This may result in a segmentation fault if you access data you shouldn’t, but otherwise… it works.
To fix this, we have to add boundary checks that make sure we are not accessing data that it outside the array. We need to check for values less than 0, and values larger than the maximum number of columns or rows.
We can guard against negative indexes before the start of the loop. Here we can check if the start column or row is less than 0, and then change the start column or row to 0. This will ensure that we do not try to use a negative index.
To guard against going past the end of the array we add a similar if statement or adjust the condition in the for loop. If we adjust the condition, we need to loop while the current column (c) is less than the end_col, and it is less than MAX_MAP_COL. In this way we ensure we do not go past the end of the array.
The code for both of these options are shown in the code snippet below.
void draw_map(const map_data &map, const point_2d &camera){  int start_col = camera.x / TILE_WIDTH;  int end_col = (camera.x + screen_width()) / TILE_WIDTH + 1;  //...
  if (start_col < 0) start_col = 0;  //...
  for(int c = start_col; c < end_col && c < MAX_MAP_COLS; c++)  {    //...  }}
Have a go at coding this up yourself. Make sure you that it handles all four edges of the screen/array.
This example demonstrates a great feature of the array. By using an expression as the index, you can create code that helps you access just the parts that you need. In this case we have been able to loop over just the part of the array that is drawn to the screen.
With this functioning nicely, let’s look at where we can take this program from here.