Set up my VS Code Extensions
Visual Studio Code has an extensive library of Extensions that let you add improved functionality for languages, debuggers, and tools to support your development workflow.
Using extensions in VS Code will make it easier and faster to code with whatever language or tools you are using.
C# Language Extensions
For C# code, we recommended that you install the C#, C# Dev Kit and IntelliCode for C# Dev Kit extensions using one of the methods below:
Method 1: Via the Command Line
You can install these C# extensions directly from your terminal by running:
code --install-extension ms-dotnettools.csharpcode --install-extension ms-dotnettools.csdevkitcode --install-extension ms-dotnettools.vscodeintellicode-csharpMethod 2: Within Visual Studio Code
To add these extensions within Visual Studio Code:
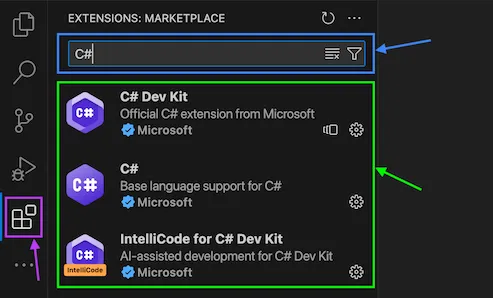
- Open Visual Studio Code and click on the Extensions tab in the left panel (shown in the purple box in the image below).
- Type “C#” in the Search bar at the top (shown in the blue box).
- Click “Install” for each of the extensions listed (shown in the green box).
Method 3: Via the Extensions Website
Install the following C# extensions directly from the Visual Studio Marketplace:
C# C# Dev Kit Intellicode for C# Dev KitC++ Language Extensions
For C++ code, we recommended that you install the C/C++ Extension Pack extension using one of the methods below:
Method 1: Via the Command Line
To install the C++ Extension Pack directly from your terminal:
code --install-extension ms-vscode.cpptools-extension-packMethod 2: Within Visual Studio Code
To add the C++ extension within Visual Studio Code:
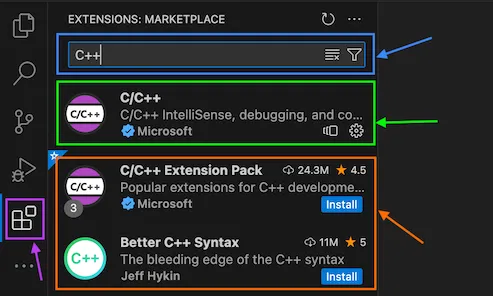
- Open Visual Studio Code and click on the Extensions tab in the left panel (shown in the purple box in the image below).
- Type “C++” in the Search bar at the top (shown in the blue box).
- Click “Install” for the “C/C++” extensions (shown in the green box).
- (Optional) Click “Install” for any other extensions you want to install (shown in the orange box).
Method 3: Via the Extensions Website
Install the C++ Extension Pack for comprehensive C++ support:
C++ Extension PackUsing WSL on Windows
If you are using the Windows (WSL) setup guide, you will also need to install the WSL extension using one of the methods below:
Method 1: Via the Command Line
You can install the WSL extension directly from the terminal:
code --install-extension ms-vscode-remote.remote-wslMethod 2: Within Visual Studio Code
To add the WSL extension within Visual Studio Code:
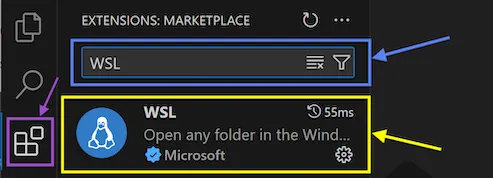
- Open Visual Studio Code and click on the Extensions tab in the left panel (shown in the purple box in the image below).
- Type “WSL” in the Search bar at the top (shown in the blue box).
- Click “Install” for the “WSL” extension (shown in the yellow box).
Method 3: Via the Extensions Website
Install the WSL extension directly from the Visual Studio Marketplace:
WSL Extension