While Loop
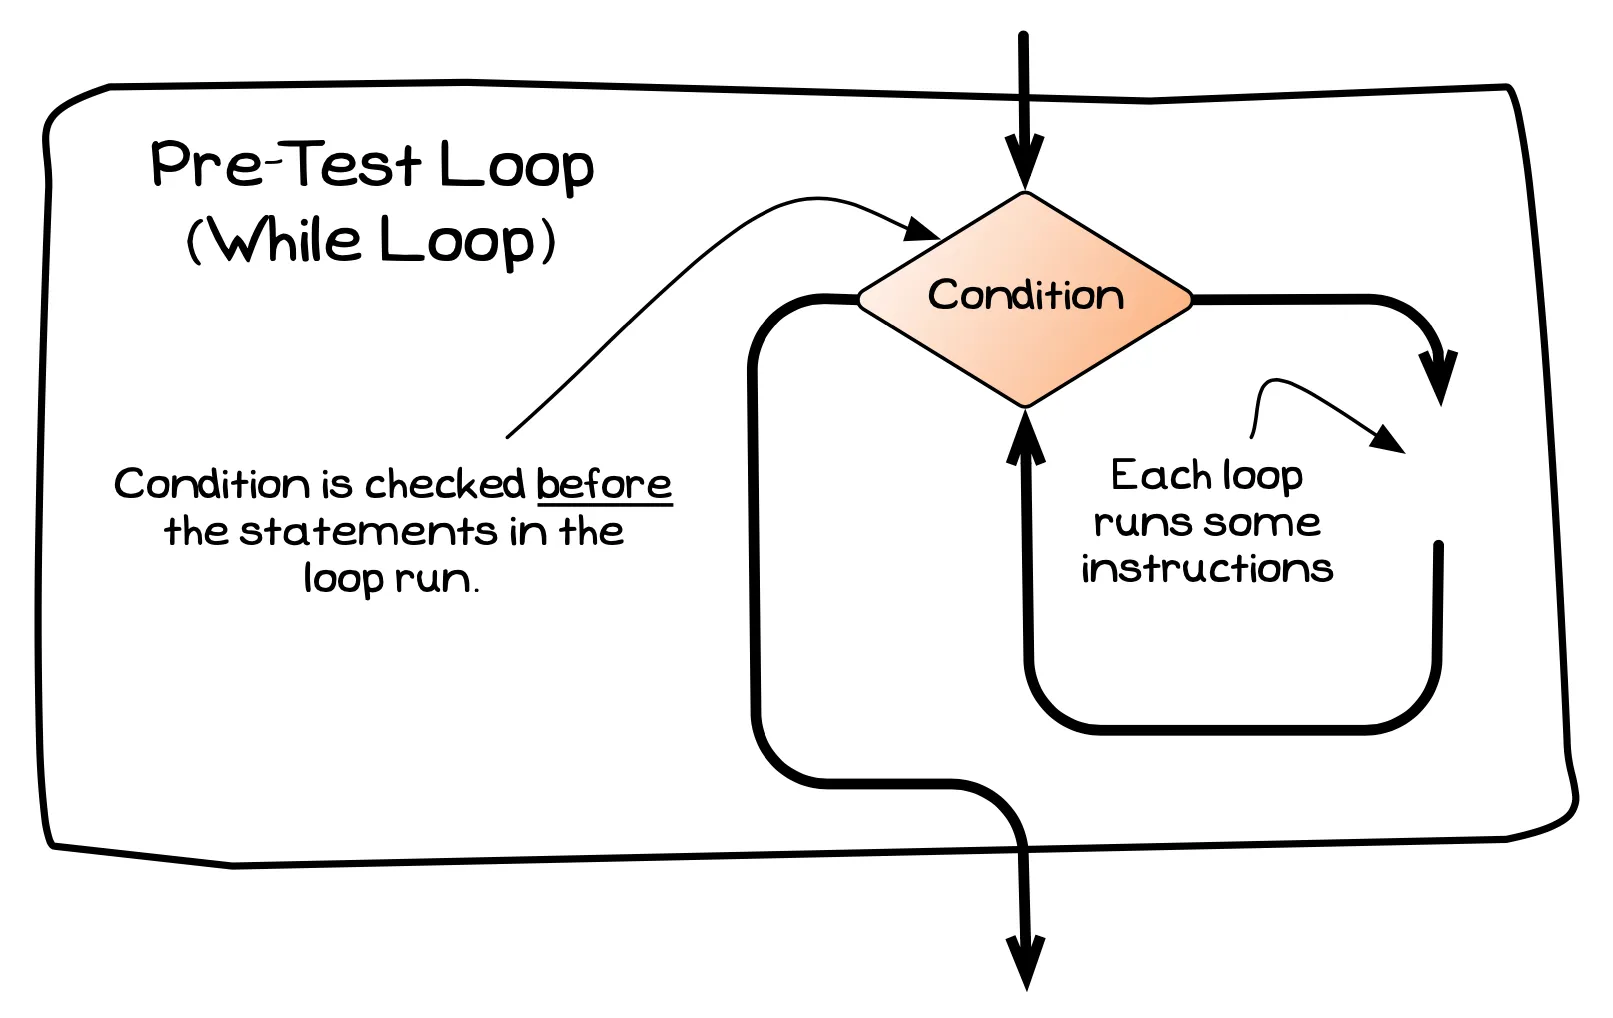
The while loop is a common feature of most programming languages. It is a pre-test loop, meaning that the statement starts with a condition, then a statement to be repeated. This means the code inside the loop will be repeated zero or more times, depending on the value of the condition. This is visualised in the following diagram.

While — when, why, and how
The while loop is a flexible way to have code repeated and will be used a lot in your programs. It should be your first thought when you want something to be repeated.
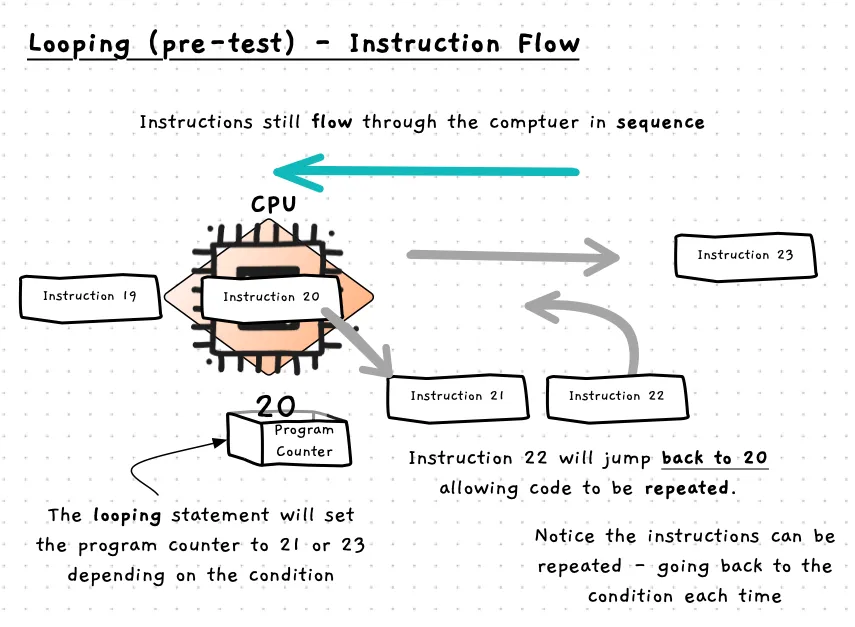
As with branching, a while loop is a form of control flow because it literally controls the flow of instructions to the CPU. See the image below for a visualisation of this. Overall, the instructions are still being processed in sequence — there are just two paths to choose from (repeating or ending the loop).

When planning to use a while loop, you first need to determine the condition that will indicate if the loop should be run. This condition determines if the computer continues into the while loop’s body, or if the loop body is skipped and the sequence continues with the instructions that follow the loop. You then want to make sure that something in the loop will change the condition so that there is a definite end to the loop. This could be reading a value from the user, or re-checking which events have occurred.
At a lower level, the while loop is achieved using two jump statements:
- At the start of the loop, we have a conditional jump. If the condition is false, we jump to the instruction that follows the loop. Otherwise, control continues to flow in sequence to the loop’s body (the statement following the condition).
- At the end of the body of the loop, a jump statement is added to go back to the condition, and step 1 is repeated.
It is important to remember these actions that are performed. The while is just testing at the start, then either going into the body of the loop or jumping to the statement that follows. The value the condition evaluates to may change at any time, but it will only be checked when control is back at the top of the loop and the computer needs to determine whether to run the loop again or not.
In C#
In C# the while loop starts with the while keyword followed by the condition within parenthesis. The statement to be repeated follows this, which in almost all cases will be a compound statement.
How does while work?
Let’s work through two examples: a while loop for a terminal-based program and one for a graphical application using SplashKit.
Counting with while
The following code provides a simple example of how to work with a while loop. In this program we want to output a count from 0 up to a target the user provides. To achieve this, we will need a variable for the target which will store the value the user enters. We will also need a variable to keep track of our count, indicating which value we are up to.
These steps are coded into the program below.
The user is asked to enter a number, which we store in the target variable, and we create a second variable (i) that we use to count the number of times the loop runs. Before the loop, i is set to 0 as we generally count from 0 in our code.
The while loop runs while i is less than the target. Within the loop, we use the i++ assignment statement to increase the value of i. This means that the value of i will eventually be larger than or equal to the target, thereby ensuring the loop will end.
using static System.Console;using static System.Convert;
int target;
Write("Count to: ");target = ToInt32(ReadLine());
int i =  0;
while (i < target){ WriteLine(i); i++;}Use the following images to see how this runs.
Event Loops - Dynamic graphical programs
Now let’s look at how we can use a while loop to keep a window open in SplashKit. In this case, we can use the QuitRequested method from SplashKit to find out if the user has asked to quit the program by closing the SplashKit window on their screen. QuitRequested will return false if the user has not asked to quit, so we need to loop while quit is not requested. Remember, in C# we use ! for “not”, giving us a condition !QuitRequested() for our loop.
Within the loop, we need to tell SplashKit to respond to any events the user has performed. This is achieved with the ProcessEvents() method. It reads things like key presses, mouse movements, and window closes, and retains this information so that you can access it using other methods. In this case, it will record if the user has asked to quit, and we’re accessing this information when we call QuitRequested in the condition. If you forget to add the call to ProcessEvents then you will not be able to close the window. In these cases, switch to the terminal and kill the program with ctrl-c.
using static SplashKitSDK.SplashKit;
OpenWindow("Circle Test", 400, 400);ClearScreen(ColorWhite());
while (!QuitRequested()){    FillCircle(RandomColor(), Rnd(ScreenWidth()), Rnd(ScreenHeight()), Rnd(50));    RefreshScreen();
    ProcessEvents();}
Use the following images to see how this runs.
If you have looked at sample code for most windowed programs online, you will not have seen this loop. This is what is generally known as an event loop, which the libraries usually take care of for you. That is great for productivity, but not great when you are trying to learn how this all works. With SplashKit we want you to be in control, so you need to create something like this loop to keep things going. When you move on to professional libraries, you will then have a good idea of what they are doing for you in the background.