Move the Spider
Now we have a loop constantly updating what is drawn to the screen, we can focus on making some changes. Let’s test this out first, then see how we can use control flow to limit when the data changes.
Bye bye spider
To get things moving let’s add a SPIDER_SPEED constant, which we can then add to the spiderX value within the loop:
Constants:    SCREEN_WIDTH = 800    SCREEN_HEIGHT =  600    SPIDER_RADIUS = 25    SPIDER_SPEED = 3
Variables:    spiderX (an int) = SCREEN_WIDTH / 2    spiderY (an int) = SCREEN_HEIGHT / 2
Steps:    Open the window - use SCREEN_WIDTH and SCREEN_HEIGHT
    While not quit        Increase spiderX by SPIDER_SPEED
        Draw the game        Process Events
Code this up, and compile and run. What happens?
When you run this you should see the circle move! Cool! How is this happening? Well, remember that the loop is running over and over, and in each loop we are changing the value of spiderX. The code then clears the screen, draws the circle (with the new spiderX), and shows it to you. So you see the circle move.
This is how all animation works within the computer — just like a flip-book where the picture changes each page. Here the RefreshScreen call flips to the new “page” that the user will see. You have the computer draw the new page, then show it to the user, then draw the next page, and show it to the user, over and over in the loop. It’s amazing what you can do when you have something that can process millions of small instructions each second.
Play around with this now. Try the following changes. For each change, think about what will happen before you run it. You want to be able to see what is going to happen in the code without running it, and things like these small tests can help you practice that.
- Remove clear screen.
- Decrease, rather than increase,
spiderXeach loop. - Increase
spiderYinstead ofspiderX. - Try decreasing
spiderYinstead of increasing it each loop. - Increment both
spiderXandspiderYeach loop. - Test different combinations, for example increase
spiderXbut decreasespiderY.
Controlling spider movement
Having the spider move off the screen is fun, but we want the user to be in control.
If only there was a way to say when we want this code to run, rather than always increasing or decreasing these values. We could then change the values only when the user is holding down a certain key on the keyboard.
This is where we can use a branching statement. For example, we can increase spiderX if the user is holding down the right arrow key. In general, we could call this step handle input, as it will check for external events and use these to update things within the program (within the digital reality).
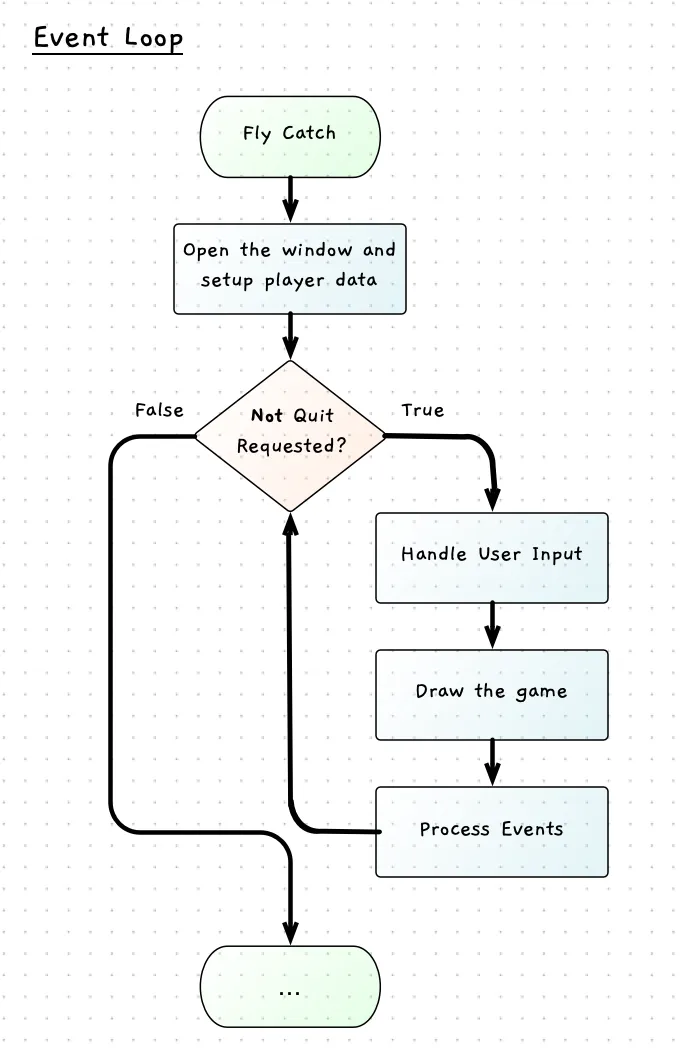
The following flowchart illustrates where the handle input step would go in our processing. A good place for this logic is at the start of the event loop before, we draw the screen. It would work anywhere in the loop, but it made more sense to us to have it at the start. That way we update where things are before we draw the current scene.

This can be represented in the pseudocode as follows:
Constants:    SCREEN_WIDTH = 800    SCREEN_HEIGHT =  600    SPIDER_RADIUS = 25    SPIDER_SPEED = 3
Variables:    spiderX (an int) = SCREEN_WIDTH / 2    spiderY (an int) = SCREEN_HEIGHT / 2
Steps:    Open the window - use SCREEN_WIDTH and SCREEN_HEIGHT
    While not quit        Handle Input        Draw the game        Process Events
Going right and left
To move right, we can add an if statement that contains the code to increase the value of spiderX. This is captured in the following pseudocode, where we are starting to expand out the steps within the handle input section of the code.
Constants:    SCREEN_WIDTH = 800    SCREEN_HEIGHT =  600    SPIDER_RADIUS = 25    SPIDER_SPEED = 3
Variables:    spiderX (an int) = SCREEN_WIDTH / 2    spiderY (an int) = SCREEN_HEIGHT / 2
Steps:    Open the window - use SCREEN_WIDTH and SCREEN_HEIGHT
    While not quit        Handle Input            If the user is holding down the right arrow              Increase spiderX by SPIDER_SPEED
        Draw the game            Clear the screen to white            Fill a black circle using spiderX, spiderY, and SPIDER_RADIUS            Refresh the screen to show it to the user
        Process Events
Try coding this and test that the spider now only moves when you press the right arrow key.
Controlling Speed
Return to the idea of a flip-book. Imagine an animation with a circle moving from the left to the right of the page. How long will this take?
The answer depends on how quickly you flip through the pages. That is the same with our code here. To help ensure a consistent speed, we can limit the number of times we redraw the screen. SplashKit has a RefreshScreen method that accepts an integer argument indicating a target frame rate. This method makes sure our program does not exceed the specified frames per second.
For our Fly Catch program we can update our refresh screen call to limit us to sixty frames per second using the following line of code.
RefreshScreen(60);Moving left
Now let’s add the code to move the player left if they hold down the left arrow key. Here there are a few options we could use. We could use an if … else if, or just have an if followed by another if. Let’s think through these options.
If we use an if … else if we will test the right arrow and move right, else test the left arrow and move left. Our code would only check the left arrow if the user is not already moving right. The alternative is to have two separate if statements in sequence. This would test each arrow independently of the other arrow key.
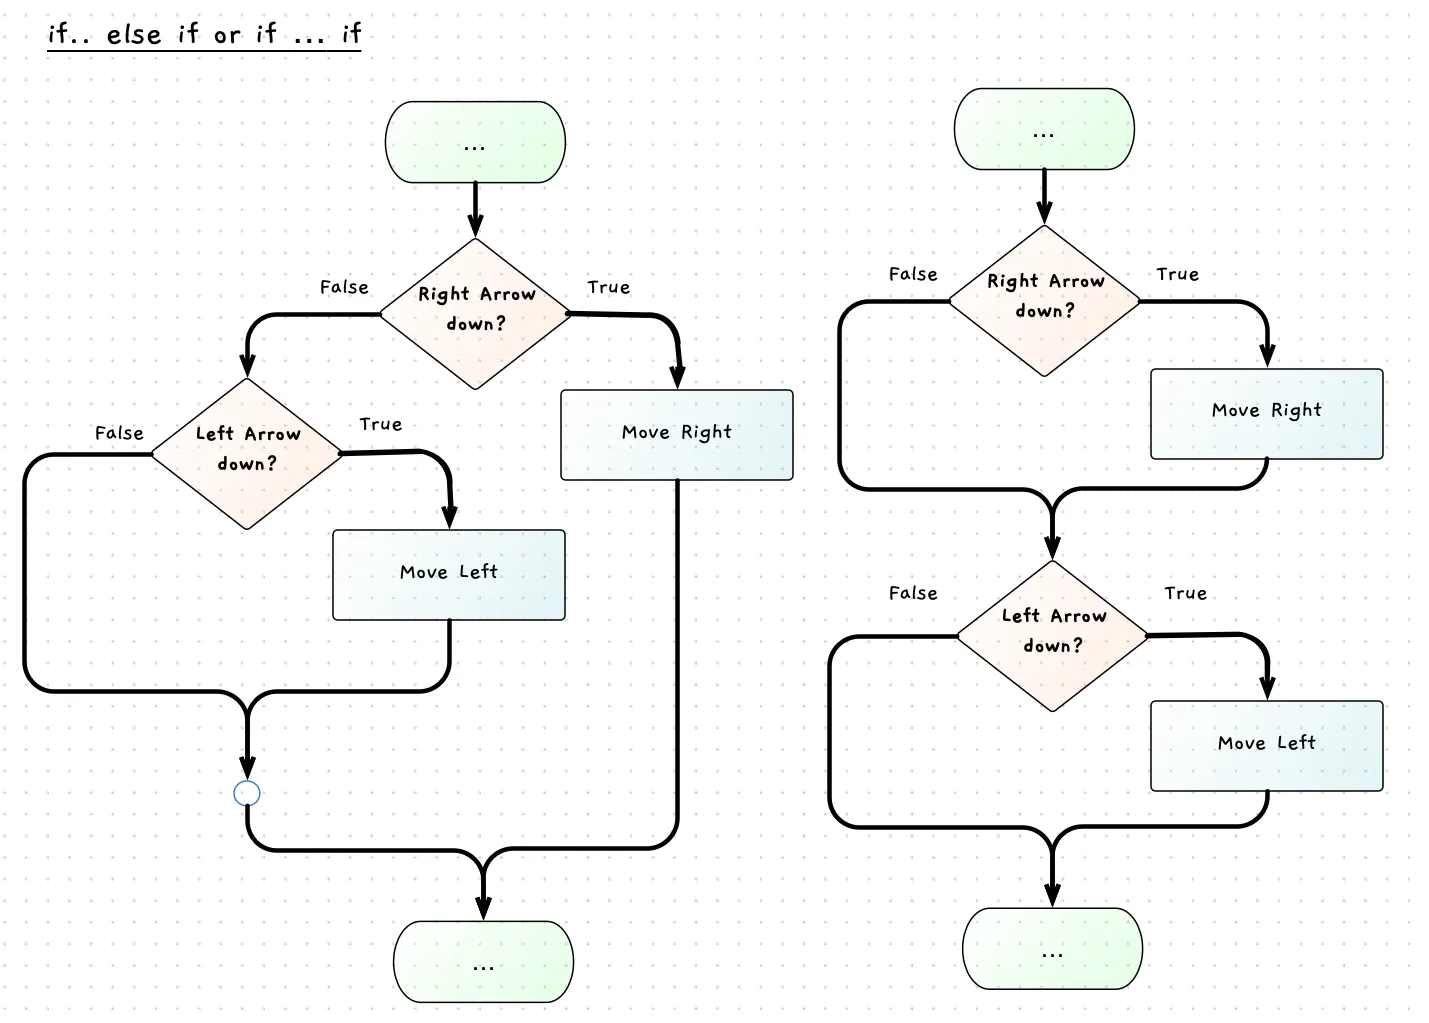
Which version do we want? It may be hard to picture the implications of this choice. To help we can draw this as a flowchart so that we can visually see the different paths through the logic. The two options are shown in the following figure.

The flowchart on the left shows the if…else if … option. Notice that the first decision impacts the whether the second if statement is evaluated or not. If you hold down the right arrow then you move right. If you do not hold down the right arrow, and you do hold down the left arrow, then you move left. Hold down both arrows and you move right.
In contrast, the flowchart on the right shows the two sequential if statements. It works the same if you hold down the keys individually, but when you hold down both arrow keys it works differently. In this case, it will move right (adding SPIDER_SPEED to spiderX) and then move left (subtracting SPIDER_SPEED to spiderX). The two actions will cancel each other out, so the spider will remain stationary.
In this case we have decided to code this as sequential if statements. That way holding down both keys will not move the spider. The resulting pseudocode is shown below:
Constants:    SCREEN_WIDTH = 800    SCREEN_HEIGHT =  600    SPIDER_RADIUS = 25    SPIDER_SPEED = 3
Variables:    spiderX (an int) = SCREEN_WIDTH / 2    spiderY (an int) = SCREEN_HEIGHT / 2
Steps:    Open the window - use SCREEN_WIDTH and SCREEN_HEIGHT
    While not quit        Handle Input            If the user is holding down the right arrow                Increase spiderX by SPIDER_SPEED            If the user is holding down the left arrow                Decrease spiderX by SPIDER_SPEED
        Draw the game            Clear the screen white            Fill a black circle using spiderX, spiderY, and SPIDER_RADIUS            Refresh the screen to show it to the user
        Process Events
Code this up, and test it to ensure you can move left and right. Make sure to try holding down both arrow keys. If you like, test out the alternate logic to see the difference.
Staying on the web
In your testing, have you noticed that you can move off the edge of the screen? We should keep the spider on its web. To do this, we can add in some additional checks to keep the spider in the screen and on its web.
To do this we can adjust the condition to add extra logic, using boolean operators, to restrict the spider’s movement. It is not enough just to press the right key. You also need to be sure that moving right will not move the spider off the screen. This could be coded in a number of ways depending on how we want this to work. Some options are shown in the following code snippet:
// Option 1if (KeyDown(KeyCode.RightKey) && spiderX + SPIDER_SPEED + SPIDER_RADIUS < SCREEN_WIDTH){    spiderX += SPIDER_SPEED;}
// Option 2if (KeyDown(KeyCode.RightKey) && spiderX + SPIDER_RADIUS < SCREEN_WIDTH){    spiderX += SPIDER_SPEED;}
// Option 3if (KeyDown(KeyCode.RightKey) && spiderX + SPIDER_RADIUS < SCREEN_WIDTH){    spiderX += SPIDER_SPEED;    if (spiderX + SPIDER_RADIUS > SCREEN_WIDTH)    {       spiderX = SCREEN_WIDTH - SPIDER_RADIUS;    }}
Option 1 tests the new position of the spider (spiderX + SPIDER_SPEED) to see if the right side (... + SPIDER_RADIUS) will still be on the screen (... < SCREEN_WIDTH). This will never let the spider go past the edge of the screen. However, it may mean that the spider can never get right next to the edge of the screen. For example, if the right edge is 2 pixels from the edge of the screen, then when we add SPIDER_SPEED (3) to that, it will not be able to move. So the spider remains stuck 2 pixels away from the edge.
Option 2 takes a different approach. It checks if the current right side of the spider (spiderX + SPIDER_RADIUS) is on the screen (... < SCREEN_WIDTH) and if it is, allows the spider to move. This means that the spider may be able to move slightly off the edge of the screen. Using the above scenario, the spider would be able to move but would then be one pixel off the right-hand side.
Option 3 adds an if statement inside the move right code which moves the spider back whenever it has gone slightly past the edge of the screen.
Which of these options is best? Well for this game, any of them are probably ok. We would probably be a bit frustrated if we couldn’t get right to the edge — so maybe not option 1 — but then depending on the spider’s speed we may not notice this. Similarly, if the spider can go slightly off the screen it may not look right.
Pick your favourite of these options (or think of another way to achieve this) and code it up. Then test to make sure it feels right to you. Once you have this working, try adding in code to move up and down as well. It should be very similar! Get this working, and test the different key combinations before you continue.