Set up my Windows (with WSL)
In this guide, we will walk through the steps to install the necessary Applications and Tools on WSL (Windows Subsystem for Linux) with Ubuntu. This will enable you to code in C# and C++ with SplashKit.
Now, let’s get started!
To set up WSL and install SplashKit and other coding tools on Windows, follow the steps outlined below:
1. Install Windows Subsystem for Linux (WSL)
Windows Subsystem for Linux (WSL) is a feature of Windows that allows you to run a Linux environment on your Windows machine, without the need for a separate virtual machine or dual booting.
Method 1: Command Line
You can install both WSL and Ubuntu from the command-line using the following steps that have been adapted from the instructions provided in the official Microsoft documentation: Install Windows Subsystem for Linux (WSL). This is the recommended method.
Open Terminal, PowerShell or Windows Command Prompt in administrator mode by right-clicking and selecting “Run as administrator”, then copy and paste the following command to install WSL and Ubuntu:
wsl --install
Method 2: Microsoft Store
Alternatively, you can install WSL (and Ubuntu) directly from the Microsoft Store if you have this on your Windows computer.
To do this, search “WSL” in the Microsoft Store app (as shown below), or click this link.
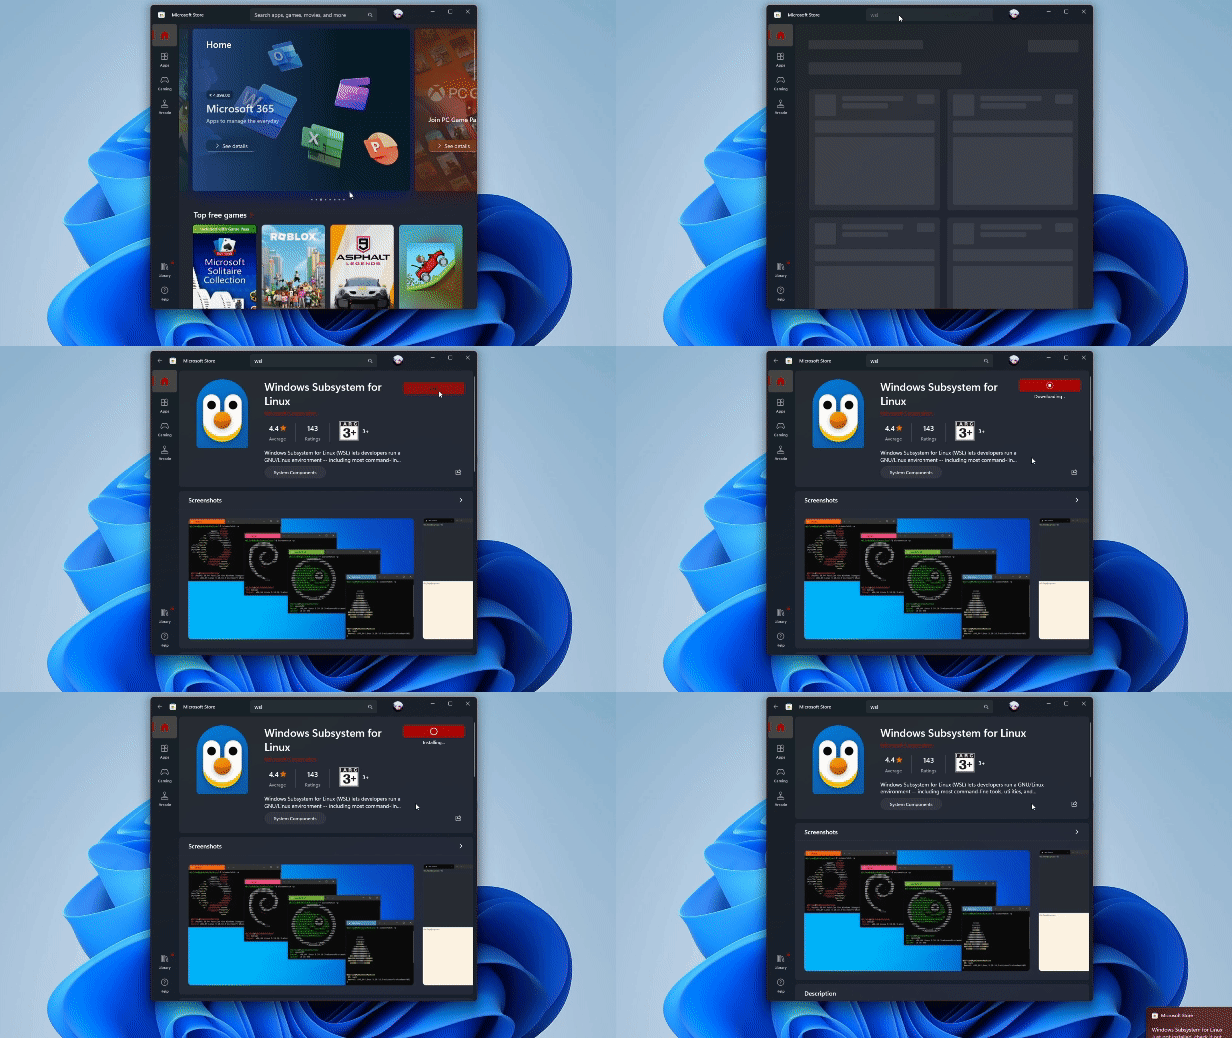
You will also need to download Ubuntu from the Microsoft Store. Search “Ubuntu” in the Microsoft Store app, or click this link.
Create Ubuntu User Account
Firstly, you need to Restart your computer if you haven’t done so already.
A terminal window installing Ubuntu should pop up automatically, otherwise open the WSL or Ubuntu app for this window to open.
When prompted, enter your new UNIX username and password.
For example, with the username “default-user”, your terminal would look like this:
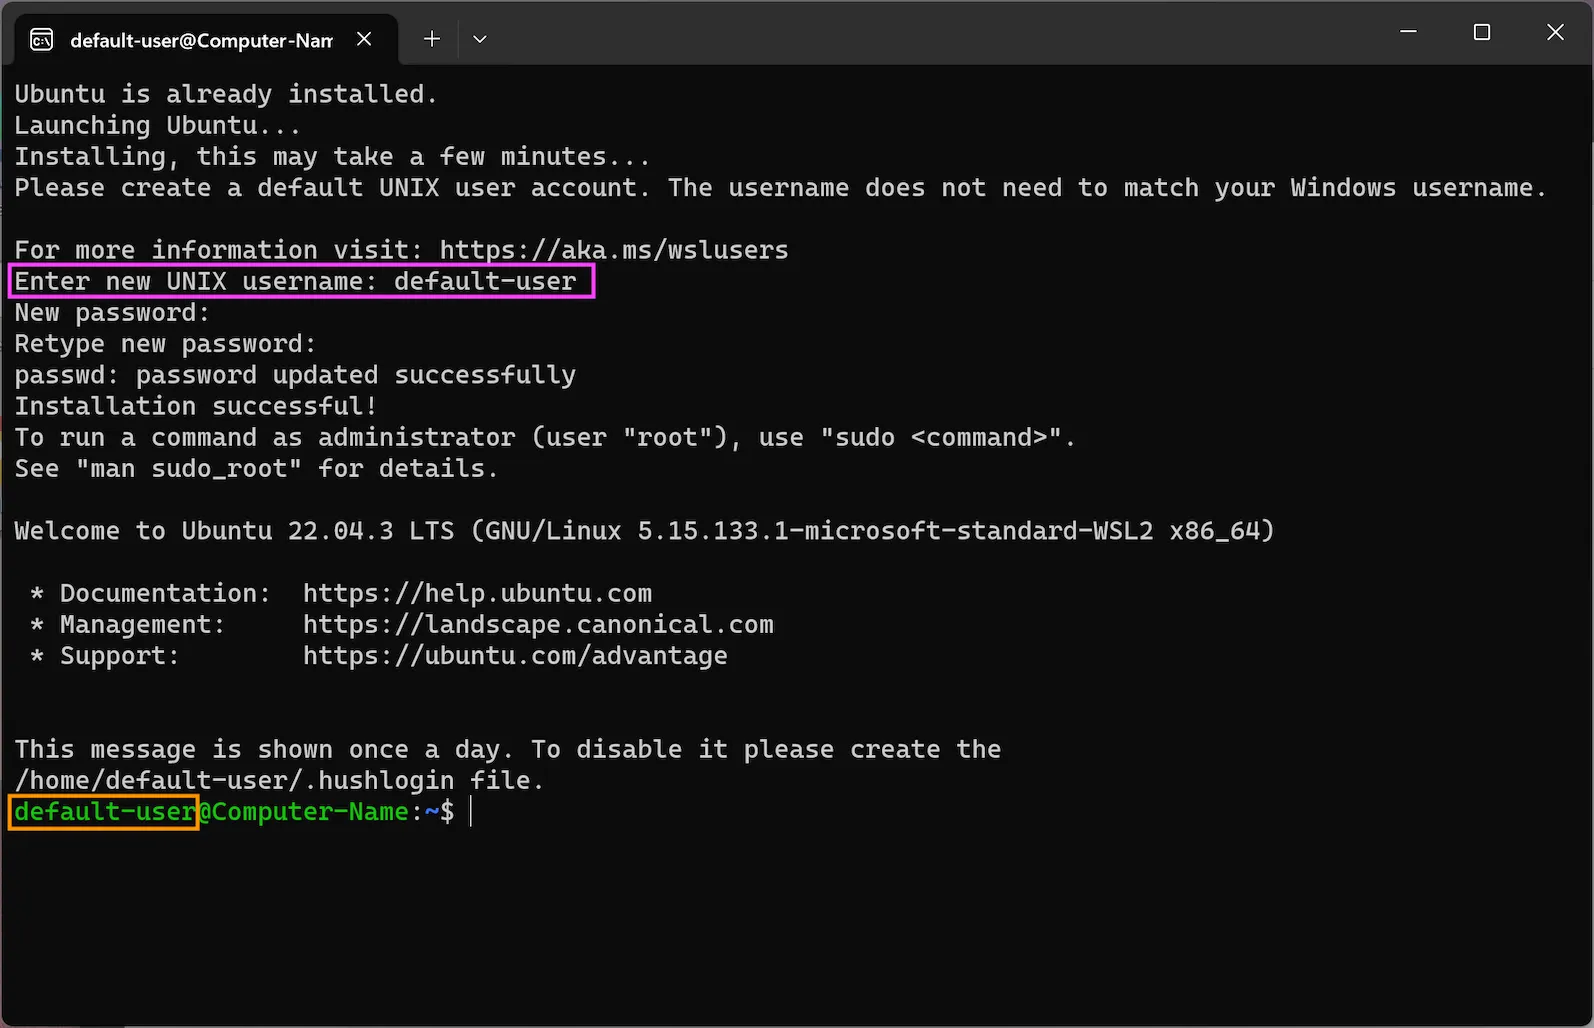
You can see in the image above where the “default-user” username was first entered (shown in the pink box), and the same username being used with the terminal prompt (shown in the orange box).
WSL is now setup and ready to use!
Configure ‘Windows Terminal’
Note: This step is optional, but encouraged.
If you want to be able to have your ‘Windows Terminal’ app automatically open with WSL, you can change the Default profile to use WSL (with Ubuntu) using the steps below:
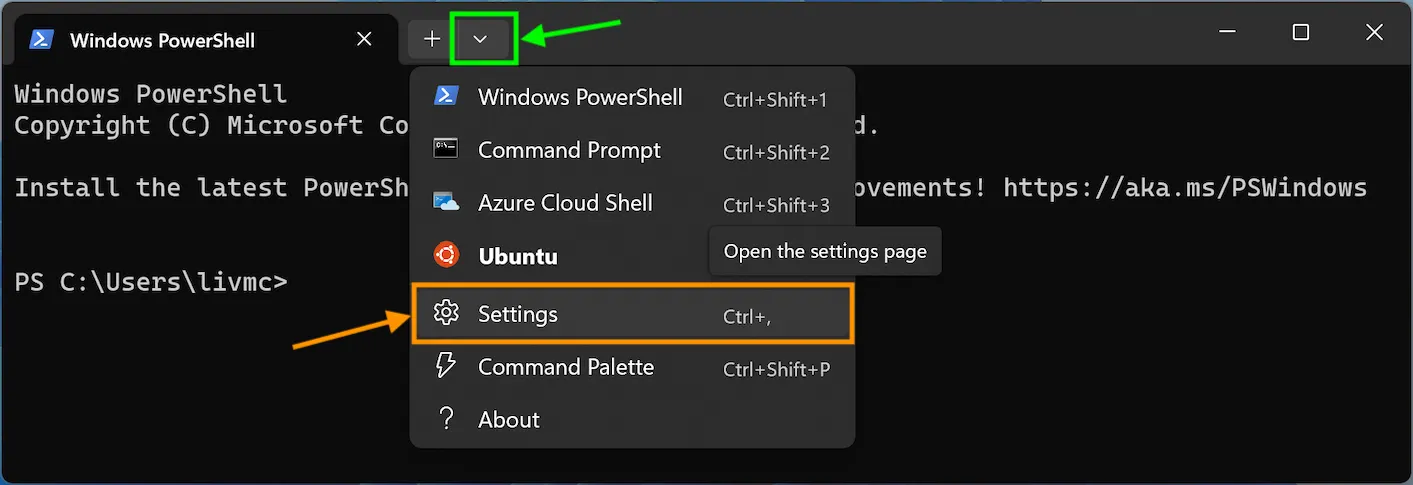
Firstly, open the Terminal app, and click the drop-down arrow at the top of the window (shown in the green box in the image below), then click on “Settings” (shown in the orange box):
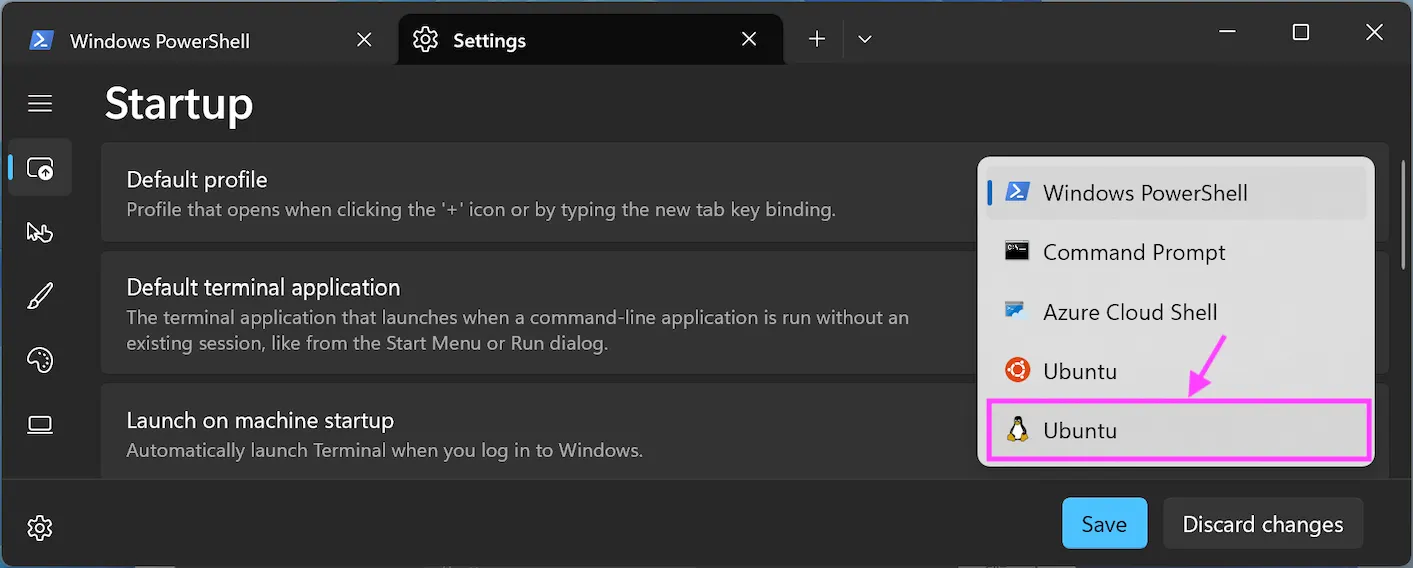
Next, click on the drop-down menu within the Default profile section and select either of the Ubuntu profiles. If you’re unsure, select the one with the Linux penguin icon (shown in the pink box):
Click Save. (Don’t forget this!)
Now your Terminal app will automatically use the WSL/Ubuntu command line when you open it.
Automated Setup
This script will install the following applications and tools:
- Visual Studio Code
- Visual Studio Code Extensions
- C/C++ Extensions
- C# Extensions
- .NET SDK
- SplashKit
- SplashKit Global
- wget
- git
- curl
- clang
- build-essential
- g++
- gdb
Open the Ubuntu Terminal and run the following command:
curl -s "https://programmers.guide/resources/WSL_InstallScript.sh" | bash /dev/stdinOnce the automated script has finished running, close and reopen the Terminal.
Run the command skm to check SplashKit is installed correctly.
Manual Steps
2. Install Command Line Tools
To install SplashKit on WSL, you will firstly need to install the git, curl, and clang tools using the apt command, which works with Ubuntu’s Advanced Packaging Tool.
Open your WSL Terminal. You can do this by using the Windows Terminal app if you followed the steps above, by searching for “WSL” in the Windows Start menu and then select the WSL App, or by using the app for the Linux distribution you installed, such as Ubuntu, which is installed by default.
Update the package lists by running the following command in your WSL Terminal:
sudo apt updateNext, install the git and curl tools by running the following command:
sudo apt install git curl clang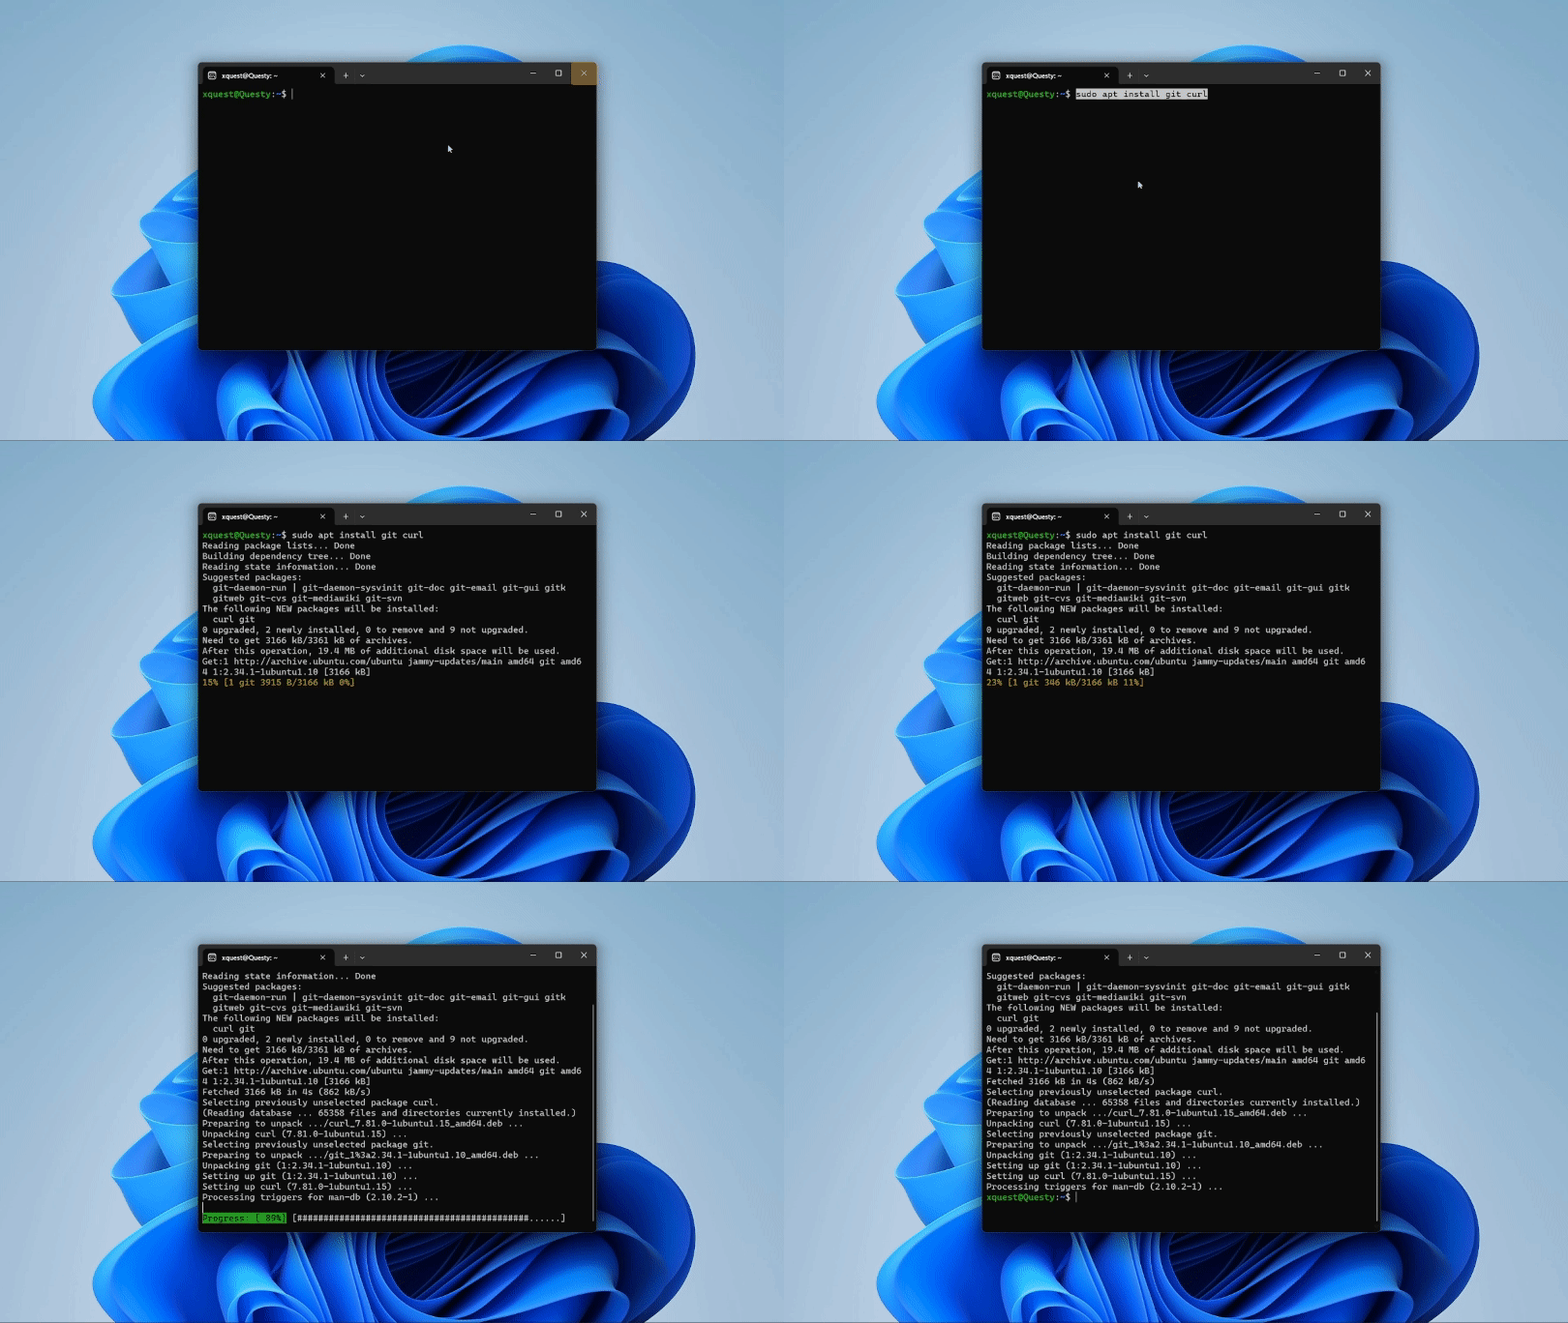
3. Install SplashKit SDK
SplashKit is a beginner’s all-purpose software toolkit that will allow you to create fun and exciting programs more easily, especially for Graphical User Interface (GUI) programs.
Copy and paste the following command into your WSL Terminal to download and run the SplashKit installer:
bash <(curl -s https://raw.githubusercontent.com/splashkit/skm/master/install-scripts/skm-install.sh)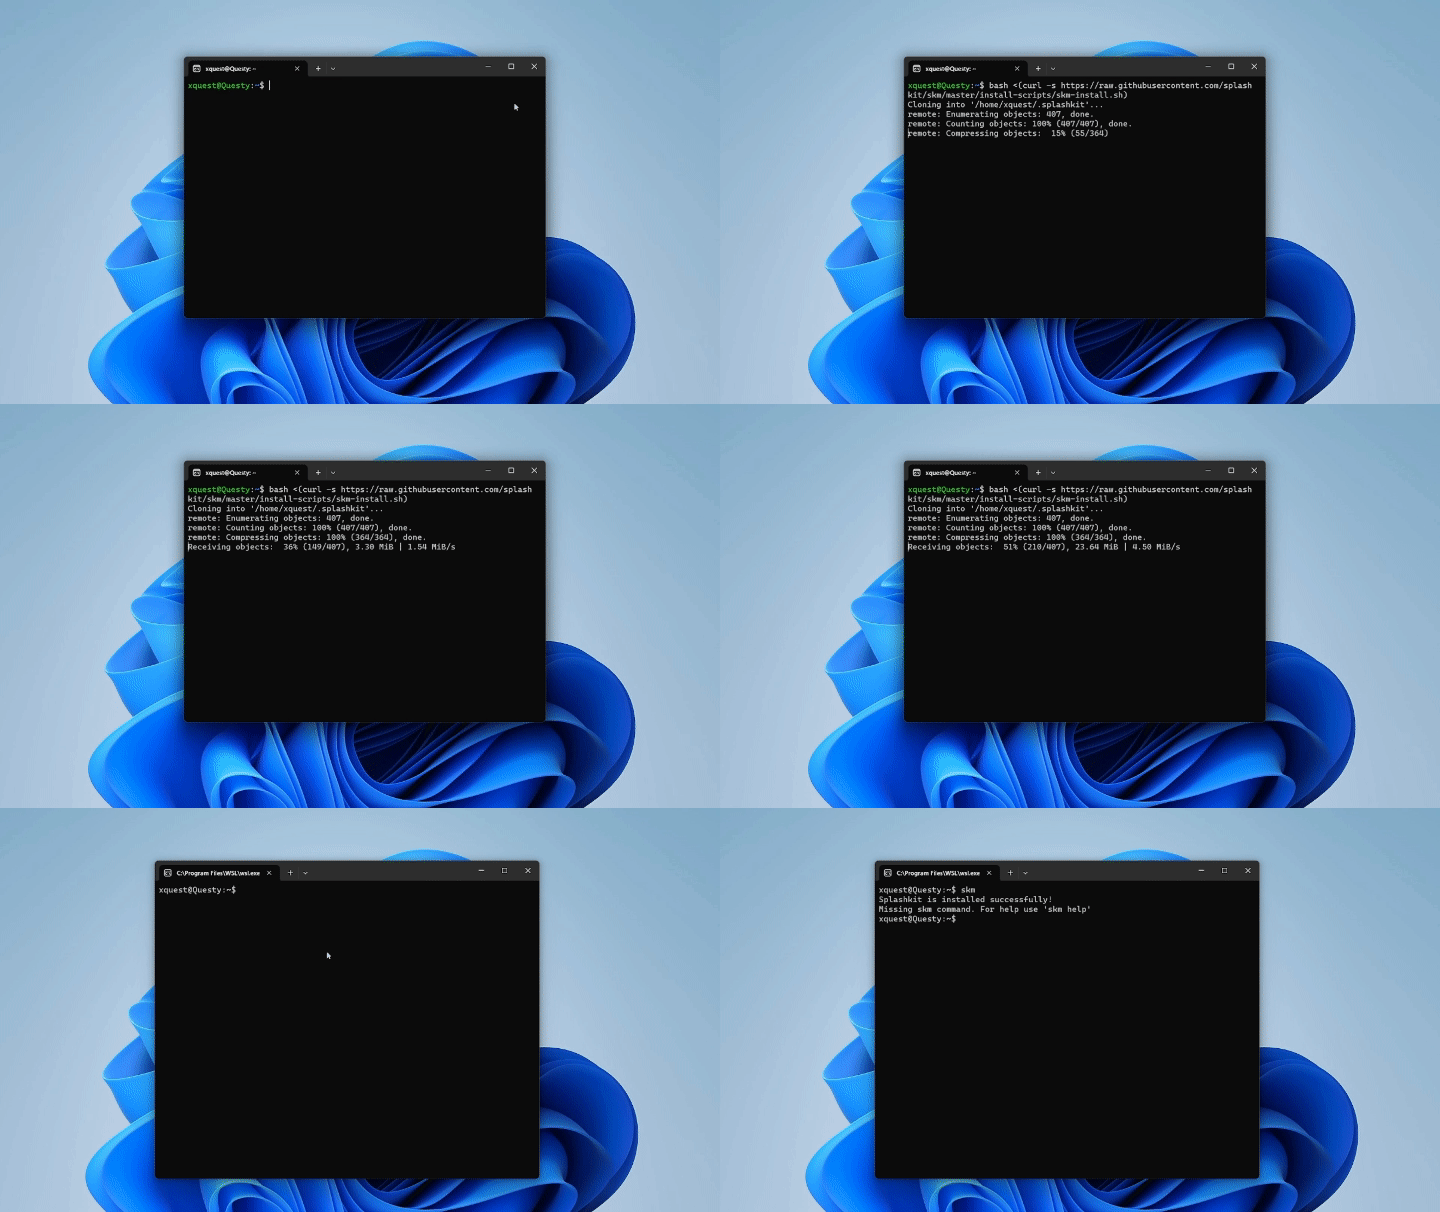
Close and reopen the WSL Terminal, then run the command below to build SplashKit:
skm linux installInstall SplashKit Globally
Finally, you will need to install the SplashKit Global Libraries. This will install the SplashKit libraries and library include files into the system’s default global locations so that the compiler can find these files when building (compiling) programs created with SplashKit.
To install SplashKit globally on your WSL, copy and paste the following command into your WSL Terminal window:
skm global install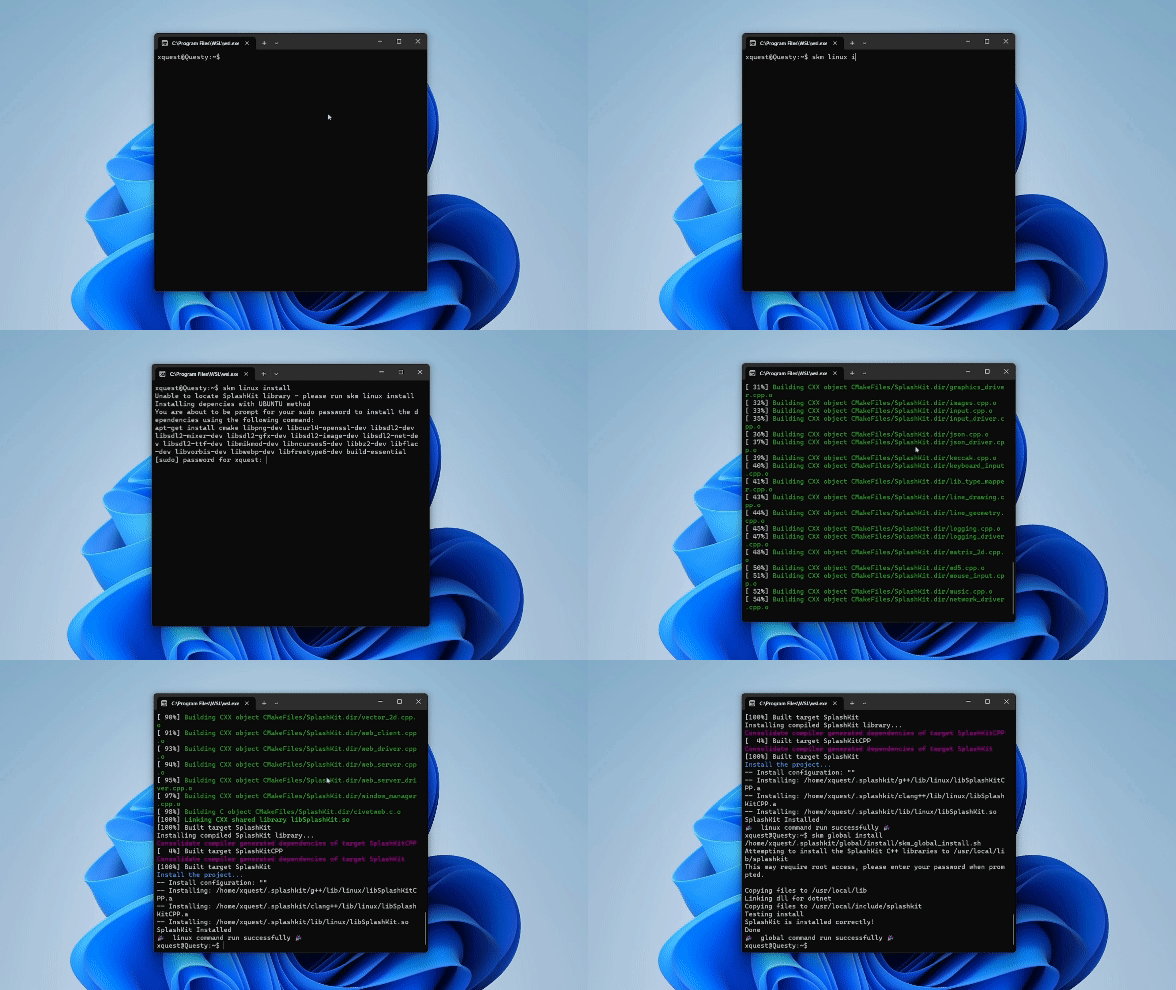
4. Install Visual Studio Code
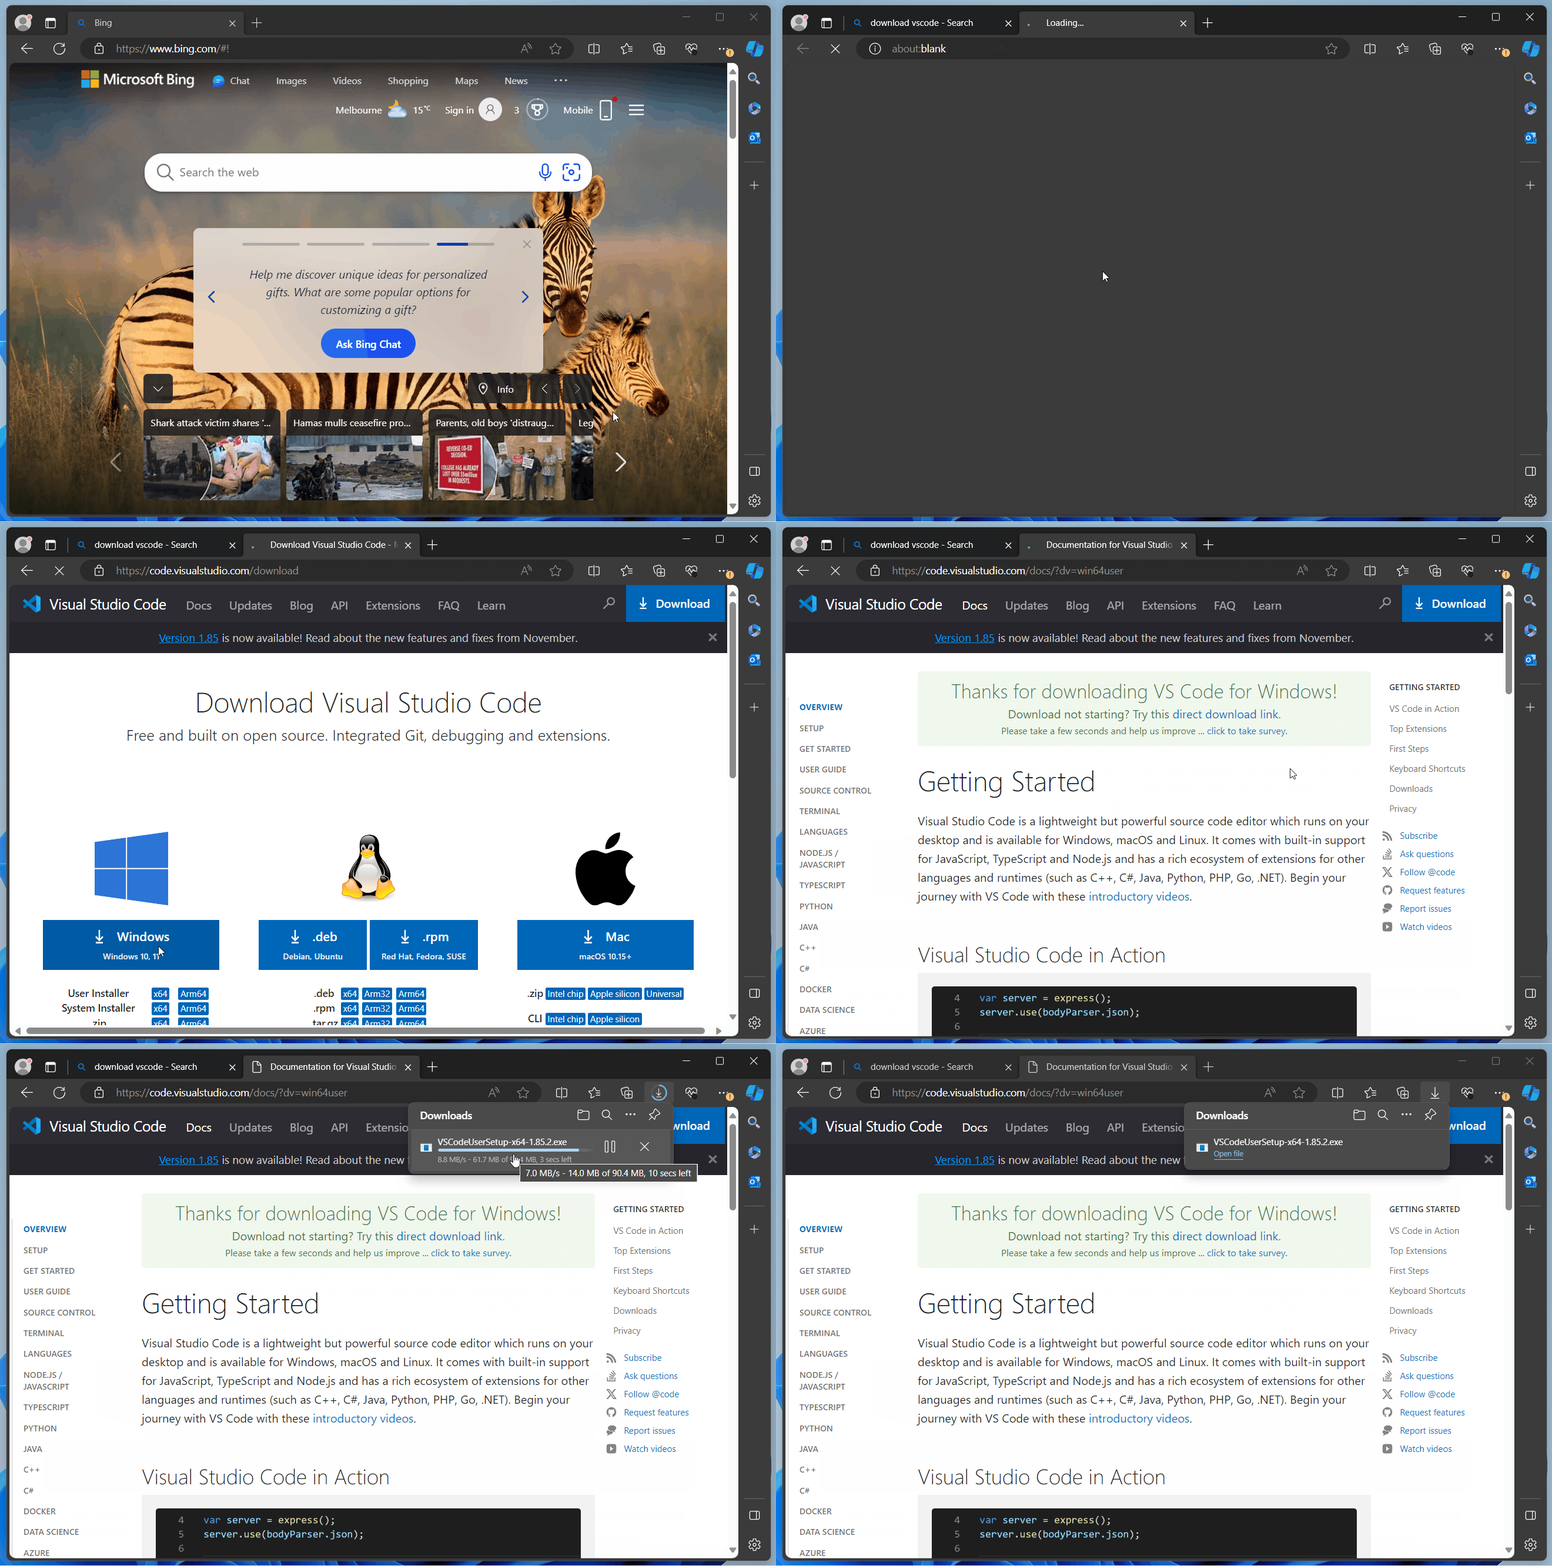
Visual Studio Code, also commonly known as VS Code or just Code, is a powerful and versatile code editor that enables efficient coding, debugging, and collaboration for your SplashKit projects!
Download and run the installer from: code.visualstudio.com/Download.
Recommended Extensions
The final step to complete the setup of VS Code is to install a few Extensions in VS Code:
Go to the page linked above, follow the steps to install both the C# and C/C++ recommended extensions, and then come back here and continue to the next step. You can use the “Back button” in your browser to return to this page.
5. Install Language Specific Tools
Some coding languages require specific tools/frameworks to be installed to be able to build and run your code files.
As you will be coding in C# and C++ in this book, let’s look at the tools needed for these languages:
C# Tools
For coding in C#, you will need to install the .NET SDK which will allow you to use the dotnet terminal command to create, build, and run your C# project code.
To install the .NET SDK, open your WSL terminal and run the following commands:
# Get Ubuntu versiondeclare repo_version=$(if command -v lsb_release &> /dev/null; then lsb_release -r -s; else grep -oP '(?<=^VERSION_ID=).+' /etc/os-release | tr -d '"'; fi)
# Download Microsoft signing key and repositorywget https://packages.microsoft.com/config/ubuntu/$repo_version/packages-microsoft-prod.deb -O packages-microsoft-prod.deb
# Install Microsoft signing key and repositorysudo dpkg -i packages-microsoft-prod.deb
# Clean uprm packages-microsoft-prod.deb
# Update packagessudo apt update
# Install .NET 8.0sudo apt-get install dotnet-sdk-8.0 dotnet-runtime-8.0The script above will install .NET 8.0, but if you want to install an earlier version, you can update the last line with your preferred version.
For example, if you want to use .NET 7.0: sudo apt install dotnet-sdk-7.0
C/C++ Tools
For coding in C++, you will need a C++ compiler and debugger. WSL comes with GCC (GNU Compiler Collection) and GDB (GNU Debugger) by default, so these may already be installed. The following command will check and install these tools for you:
sudo apt-get install g++ clang gdbThis command installs the necessary C/C++ compilers and debuggers for your development environment if they haven’t been installed already.
Your Windows machine is now set up with WSL, Visual Studio Code, and SplashKit, ready for C# and C++ development. Happy coding!
Using WSL
When you are using WSL, you have a Linux environment running in parallel with Windows. This is why you had to set up a new user account. You were setting up the account within the Linux environment. When you are working in this way, one of the challenges you will have is thinking about where the files are that you are working on, as your Windows and Linux environments will each have their files and folders. To help you get started with this, let’s consider how you can access the files in the different environments.
Accessing Windows Files and Folders from WSL
When you are in the Linux environment, your home directory is not mapped to your Windows home directory. If you want to access files from Windows, you can access this in the /mnt/c folder.
# Output the path to my Linux homepwd
# Move into my C: on Windowscd /mnt/c# Move into my Home (change to use your username!)cd /mnt/c/Users/andrew/Documents
The shell is now in the C:\Users\andrew\Documents folder, so I can access the different things I have saved here. When you use this, replace andrew with your username. So it will be in the format: /mnt/c/Users/<username>/Documents.
Accessing WSL Files and Folders from WSL
If you have been working on your projects in WSL, you can access these from Windows using the \\wsl$ path in the File Explorer. When you access this folder you will see a list of the distributions you have installed in WSL. If you navigate into the Ubuntu folder you will have access to the root of your Linux environment. So I can access my Linux home folder using the path \\wsl$\Ubuntu\home\andrew\Documents. You will need to change andrew to the name of the user you created in Ubuntu, so it will be in the format: \\wsl$\Ubuntu\home\<username>\Documents.
One convenient way of accessing your files is to run the explorer.exe program from within your WSL terminal. When you do this, you can open a File Explorer and give it a path to open. Running the following commands at the WSL Terminal will let me open my Linux Documents folder in File Explorer.
# Create Documents foldermkdir ~/Documents
# Move to my Documents folder in Linuxcd ~/Documents
# Open the current folder in Explorerexplorer.exe .
Using this option you can work within your Linux files for your programming projects, and then access these from the File Explorer when needed.
Accessing WSL Files in File Explorer
Follow the instructions below to access your WSL folders and files in File Explorer:
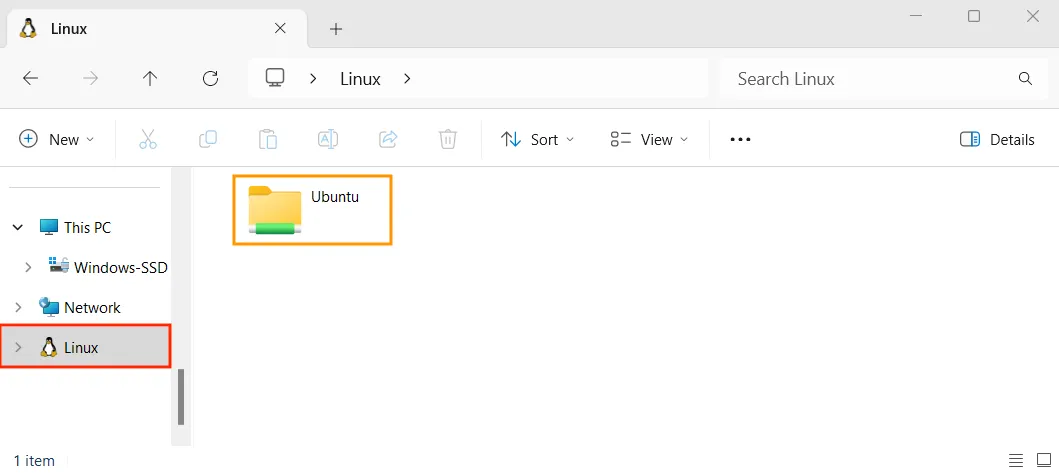
In the left sidebar panel, scroll to the bottom and click on the “Linux” folder (red box below), then navigated into the “Ubuntu” folder (orange box below):
Next, go into the “home” folder (red box below):
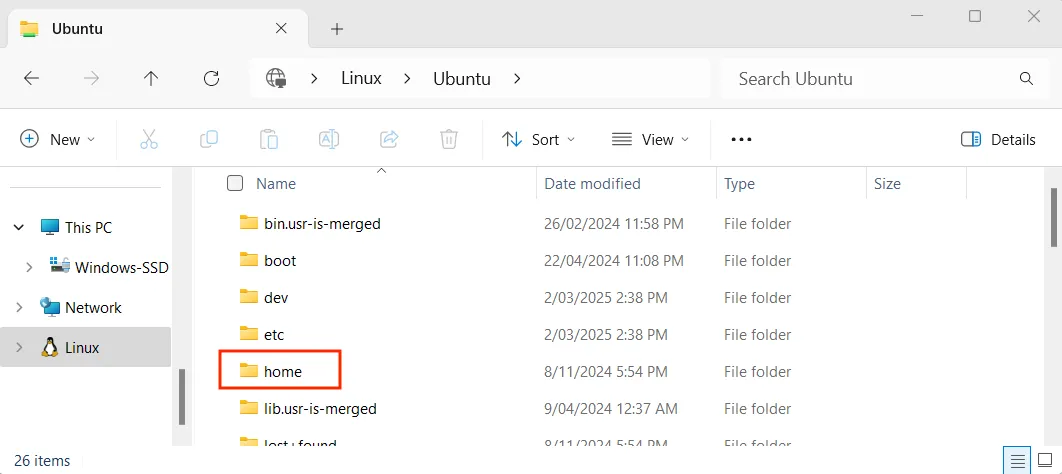
You will then see a folder with the username that you used to create your WSL/Ubuntu account. Click into this folder to see your WSL folders and files.