Graphics Methods
This journey should be fun. While reading and writing text from the terminal can demonstrate all the programming features, it doesn’t have as much of a fun factor. Creating visual and interactive programs will help you see that your programs are working as you expected.
To help you achieve this, we created the SplashKit library. This library is designed to support your journey as you learn to program. It does not take any control away from you but empowers you to make interactive, multimedia programs.
Let’s detour briefly to explore how graphics work, and how you can use them within SplashKit. There are additional articles about this on the splashkit.io website.
Graphics
SplashKit provides methods you can call to create windows and draw images and shapes for the user to see.
Open a Window
To draw, you need something to draw onto. The base interactive component in SplashKit is a Window.
Method | Required Arguments | Description |
|---|---|---|
| OpenWindow | the title, width, and height of the window | Opens a window for you to draw to. |
| ClearScreen | a color | Clears everything on the current window, making it the indicated color. |
| Delay | an integer | Delays for the number of milliseconds from the argument. |
These methods have the following declarations.
// These need:// using static SplashKitSDK.SplashKit;
public static Window OpenWindow(string caption, int width, int height);public static void ClearScreen(Color clr);public static void Delay(int milliseconds);
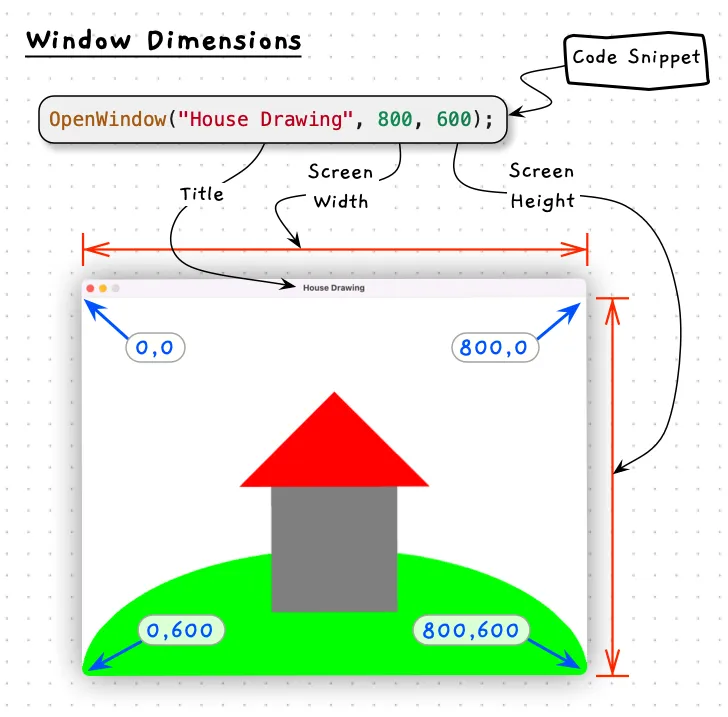
The OpenWindow method can be called to create a new window for the user to interact with, and for your code to draw upon. This method requires three arguments: the window’s title, its width and its height. For example, OpenWindow("House Drawing", 800, 600); will open a window that is 800 pixels wide and 600 pixels high with the title “House Drawing”, as shown in the following image. Please note that the house and hill are drawn by additional code.

To test this out, try out the following code for a program that opens a new window using SplashKit. In this program we are also using the SplashKit method Delay. This makes the program wait so that we can see what is happening. When you compile and run this, you will see the window open and the program delay for 5 seconds. Try changing the title and size of the window.
using static SplashKitSDK.SplashKit;
OpenWindow("Window title to change", 800, 600);
Delay(5000); // wait 5 sections (5000 milliseconds)
Pixels and Coordinates
The images you see on your computer’s screen are made up of dots called pixels: picture elements. The screen has many pixels arranged into a grid (columns and rows), meaning that each pixel has its own unique location represented as a combination of an x and y value, where x indicates the column or distance from the left of the screen, and y the row or distance from the top of the screen. Each pixel also has its own color, which we can change individually or in combination with other pixels to form images on the screen.
The following image shows an example of how the computer would draw rectangles using the SplashKit instructions to draw a filled (FillRectangle) and outlined (DrawRectangle) rectangle.
Both of these instructions require a color, an x and y value, and a width and a height.
It uses this information, and the knowledge that position (0, 0) is the top left of the screen, to know where these shapes should be drawn.
So, the blue filled rectangle is drawn at x 1, y 1, is 7 pixels wide, and 3 pixels high.
The magenta outlined rectangle is drawn 10 pixels from the left of the screen, 1 pixel from the top, 7 pixels wide, and 3 pixels high.
![]()
Double Buffering
In a graphical program the computer still executes code in sequence. If we were to show the result of every drawing instruction immediately, we would get some very odd looking programs.
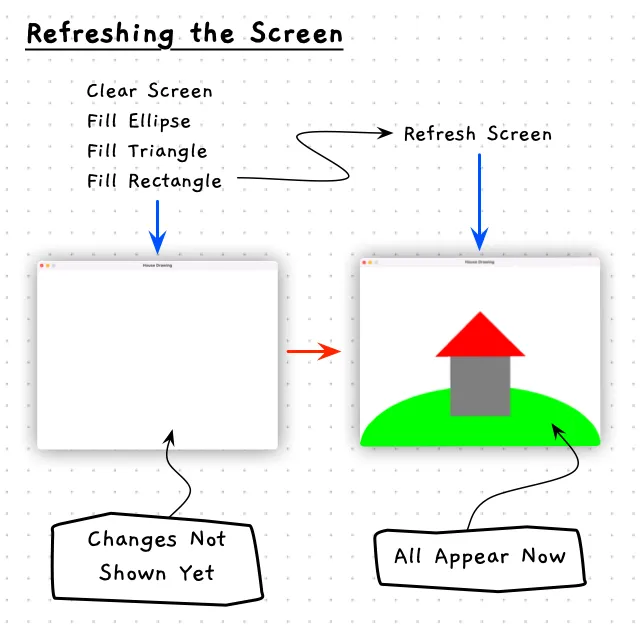
For example, to draw a house on a hill we might combine an ellipse, a triangle, and a rectangle. If the computer showed us the result of drawing each individual shape, we would see these three shapes pop up individually. In a program drawing only three shapes this might happen too quickly for a human to see, but the problem would eventually become obvious if you added enough complexity to the graphics.
Instead of having each element we draw appear individually, we just want the whole picture to appear at once.
To achieve this, SplashKit uses a technique called double buffering, illustrated in the image below. With double buffering, the computer first draws the shapes to an off-screen surface.
It then waits for a command to display that surface to the user. With SplashKit, the command for this is RefreshScreen.

Method | Required Arguments | Description |
|---|---|---|
| RefreshScreen | none | Present what has been drawn to the user. |
// These need:// using static SplashKitSDK.SplashKit;
public static void RefreshScreen();
Drawing to a Window
Now that we understand how to refer to positions on the screen, and how SplashKit uses double buffering to display graphics, let’s do some drawing of our own.
There are several methods in SplashKit that you can use to draw shapes to the window. These methods typically require arguments that allow you to control where the shape appears, its size, and its color.
Method | Required Arguments | Description |
|---|---|---|
| ColorWhite, ColorBlue, … | None | Returns a value that represents the color indicated in the name of the method. See the Color page for the complete list. |
| FillCircle, DrawCircle | A color and three numeric values for the location (x and y) and radius of the circle. | Draws a filled or hollow circle to the screen. |
| FillRectangle, DrawRectangle | A color and four numeric values for the location (x and y), width, and height of the rectangle | Draws a filled or hollow rectangle to the screen. |
| FillEllipse, DrawEllipse | A color and four numeric values for the location (x and y), width, and height of the ellipse | Draws a filled or hollow ellipse to the screen. |
| FillTriangle, DrawTriangle | A color and six numeric values for the location (x and y) or each point of the triangle. | Draws a filled or hollow triangle to the screen. |
| DrawLine | A color and four numeric values for the location (x and y) of the start and end of the line. | Draws a line from one point to another. |
These methods have the following declarations:
// These need:// using static SplashKitSDK.SplashKit;
public static Color ColorWhite();public static Color ColorBlue();// and many others...
public static void FillCircle(Color clr, double x, double y, double radius);public static void DrawCircle(Color clr, double x, double y, double radius);
public static void FillRectangle(Color clr, double x, double y, double width, double height);public static void DrawRectangle(Color clr, double x, double y, double width, double height);
public static void FillEllipse(Color clr, double x, double y, double width, double height);public static void DrawEllipse(Color clr, double x, double y, double width, double height);
public static void FillTriangle(Color clr, double x1, double y1, double x2, double y2, double x3, double y3);public static void DrawTriangle(Color clr, double x1, double y1, double x2, double y2, double x3, double y3);
public static void DrawLine(Color clr, double x1, double y1, double x2, double y2);
The following code draws a house on a hill using some basic shapes in SplashKit.
Try running it, then modify the drawing to make it your own.
using static SplashKitSDK.SplashKit;
OpenWindow("Shapes by ...", 800, 600);
ClearScreen(ColorWhite());FillEllipse(ColorBrightGreen(), 0, 400, 800, 400);FillRectangle(ColorGray(), 300, 300, 200, 200);FillTriangle(ColorRed(), 250, 300, 400, 150, 550, 300);RefreshScreen();
Delay(5000);Working with Resources
SplashKit provides methods to help you work with resources such as images, sounds, fonts, and animations. There are methods to load these into your program, and draw them to the screen or play them from your speakers.
SplashKit organises these files in a Resources folder containing sub-folders for each different kind of resource. For example, the Resources/images folder is used to store the images you want to work with. The SplashKit library comes with an skm script that you can use in the terminal to help set up your project. Running skm resources in the root folder of your project will create these resource folders for you.
Drawing images
Method | Required Arguments | Description |
|---|---|---|
| LoadBitmap | the name of the bitmap and its filename | This loads the image (bitmap) into your program. You can use the name to access this bitmap in other method calls. The filename can be the full path to a file, or the filename of a file in the Resources/images folder. |
| DrawBitmap | the image name, and two numbers for the coordinate to draw to | This draws the image you loaded with the given name, at the coordinates you provided (x and y). The coordinates indicate the top left corner of the bitmap when it is drawn. |
These methods have the following declarations:
// These need:// using static SplashKitSDK.SplashKit;
public static Bitmap LoadBitmap(string name, string filename);public static void DrawBitmap(string name, double x, double y);
To draw an image:
- Copy the image into the Resources/images folder.
- Load the image in your code using
LoadBitmap. - Draw the image using its name in
DrawBitmap.
The following code shows how you might follow these steps in a simple program.
using static SplashKitSDK.SplashKit;
// Copy "background.png" to Resources/images
OpenWindow("Drawing Test", 800, 600);
LoadBitmap("bkg", "background.png");ClearScreen(ColorWhite());DrawBitmap("bkg", 10, 20);RefreshScreen();
Delay(5000);
Drawing text
You might want to be able to draw text to the screen to display messages to the user. For static text, you are best to embed this within an image, as drawing an image is easier and faster than drawing text. For dynamic text (i.e., any text that changes as the program runs) you will need to use a text drawing method. In SplashKit you can draw simple text with fixed characters, or load a font and use that to draw the text.
Method | Required Arguments | Description |
|---|---|---|
| LoadFont | the name of the font and its filename | This loads the font into your program. You can use the name to access this font in other method calls. The filename can be the full path to a file, or the filename of a file in the Resources/fonts folder. |
| DrawText | some text, a color, x, and y | This draws the provided text in the indicated color at the given coordinates (x and y). The coordinates indicate the top left of the text. This will draw using the built-in font. |
| DrawText | some text, a color, a loaded font’s name, font size (int), x, and y | This draws the provided text in the indicated color, with the named font, at the indicated size. The coordinates (x and y) will be the top left of the text. |
These methods have the following declarations:
// These need:// using static SplashKitSDK.SplashKit;
public static void DrawText(string text, Color clr, double x, double y);public static void DrawText(string text, Color clr, string fnt, int fontSize, double x, double y);public static Font LoadFont(string name, string filename);
Several online sites provide free fonts for personal projects. The Google Fonts site is a good option. The font files should be true type fonts, which usually have a ttf file extension. Find the font you want to draw with and download it into your Resources/fonts folder. Load the font, and use the drawing methods to render text to your window.
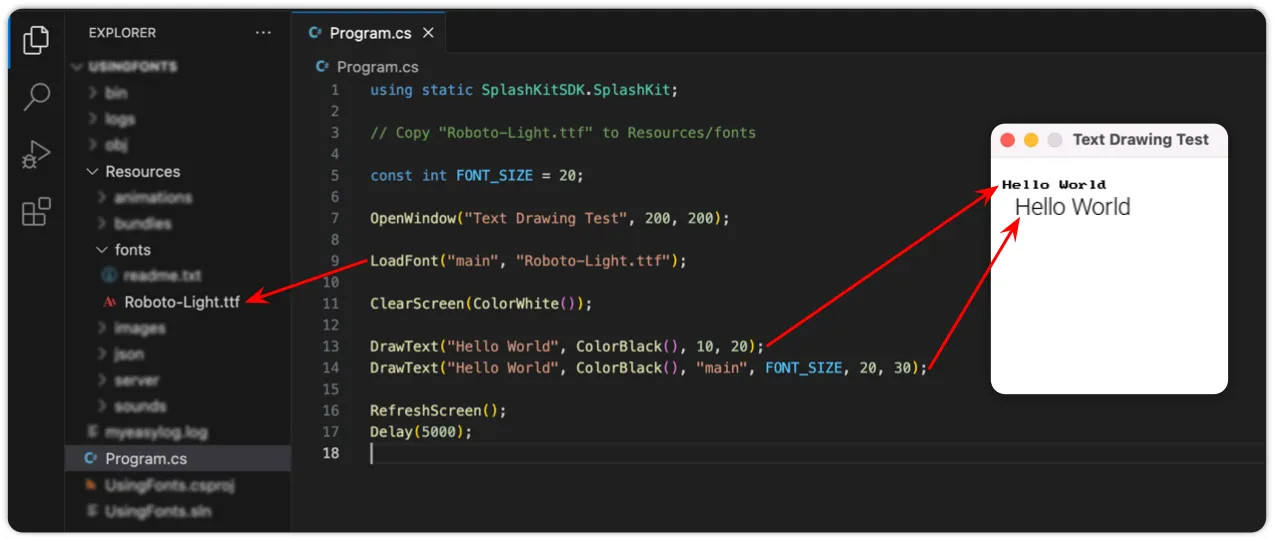
The following code draws “Hello World” to the screen using the built-in font, and the Roboto-Light font from Google Fonts.
using static SplashKitSDK.SplashKit;
// Copy "Roboto-Light.ttf" to Resources/fonts
const int FONT_SIZE = 20;
OpenWindow("Text Drawing Test", 200, 200);
LoadFont("main", "Roboto-Light.ttf");
ClearScreen(ColorWhite());
DrawText("Hello World", ColorBlack(), 10, 20);DrawText("Hello World", ColorBlack(), "main", FONT_SIZE, 20, 30);
RefreshScreen();Delay(5000);