Set up my Windows (with MSYS2)
In this guide, we will walk through the steps to install the necessary Applications and Tools using MSYS2 (Minimal SYStem) on Windows. This will enable you to code in C# and C++ with SplashKit.
Now, let’s get started!
To get SplashKit and other coding tools installed on Windows, using MSYS2, follow the steps outlined below:
1. Install MSYS2/MINGW64
-
Download the installer from the official MSYS2 website: www.msys2.org
-
To install MSYS2, double-click the downloaded executable file, and follow the on-screen instructions.
Make sure to use the default install path.
-
Use the “MINGW64” terminal
MSYS2 comes with a variety of terminal environments.
You will need to use the MINGW64 terminal environment (not MSYS or UCRT), which you can find by searching “mingw64” in the Windows Start menu and selecting the MSYS2 MINGW64 App.
-
Pin MINGW64 Terminal to the taskbar:
To make it easier to open each time, you can pin your terminal to the Taskbar.
- Open MINGW64 terminal.
- Right-click on the MSYS2 App icon in the taskbar (shown in the orange box in the image below).
- Select “Pin to taskbar” (shown in the pink box):
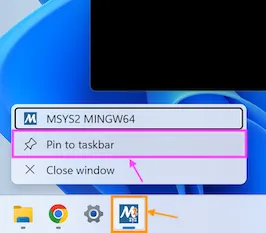 Image not subject to The Programmer’s Field Guide CC BY-NC-ND 4.0 License
Automated Setup
This script will install the following applications and tools:
- Visual Studio Code
- C/C++ Extensions
- C# Extensions
- .NET SDK
- SplashKit
- SplashKit Global
- git
- clang
- gcc
- gdb
-
Open the MINGW64 Terminal using “Run as Administrator” and run the following command:
Terminal window curl -s "https://programmers.guide/resources/MSYS2_InstallScript.sh" | bash /dev/stdin -
Once the automated script has finished running, close and reopen the Terminal.
-
Run the command
skmto check SplashKit is installed correctly. -
Lastly, try opening a “New Terminal” in VS Code (Terminal > New Terminal).
-
Then, once you’re finished, you can go to the Using MSYS2 section for more information about accessing files in your C drive with the MSYS2/MINGW64 terminal.
Manual Steps
2. Install Command Line Tools
To install SplashKit, you will firstly need to install the git, clang, gcc and gdb command line tools using the pacman package manager.
-
Copy the following command:
Terminal window pacman -S git mingw-w64-x86_64-clang mingw-w64-x86_64-gcc mingw-w64-x86_64-gdb --noconfirm --disable-download-timeout -
Paste the command into your MINGW64 Terminal.
-
Press enter to run the command.
3. Install SplashKit
SplashKit is a beginner’s all-purpose software toolkit that will allow you to create fun and exciting programs more easily, especially for Graphical User Interface (GUI) programs.
-
Copy and paste the following command into your MINGW64 terminal to download and run the SplashKit installer:
Terminal window bash <(curl -s https://raw.githubusercontent.com/splashkit/skm/master/install-scripts/skm-install.sh) -
Now, close and reopen your MINGW64 terminal, and run the following command to install the dependencies needed for SplashKit:
Terminal window skm windows install -
Install SplashKit Globally
Finally, you will need to install the SplashKit Global Libraries. This will install the SplashKit libraries and library include files into the system’s default global locations so that the compiler can find these files when building (compiling) programs created with SplashKit.
To install SplashKit globally, open the MINGW64 terminal and run the following command in the terminal window:
Terminal window skm global installYou may need to open the MINGW64 Terminal with “Run as administrator” if you have issues.
4. Install Visual Studio Code
Visual Studio Code, also commonly known as VS Code or just Code, is a powerful and versatile code editor that enables efficient coding, debugging, and collaboration for your SplashKit projects!
-
Download and run the installer from: code.visualstudio.com/Download.
-
Setup VS Code Terminal
Visual Studio Code has a built-in Terminal that you can use instead of needing to switch back and forth between VS Code and your MINGW64 terminal window. You will need to update some settings to get this working with your MINGW64 terminal.
-
Open Visual Studio Code, then press
Ctrl+Shift+Pto open the Command Palette. -
Start typing “Open user…” and then select Open User Settings (JSON) (shown in the orange box in the image below):
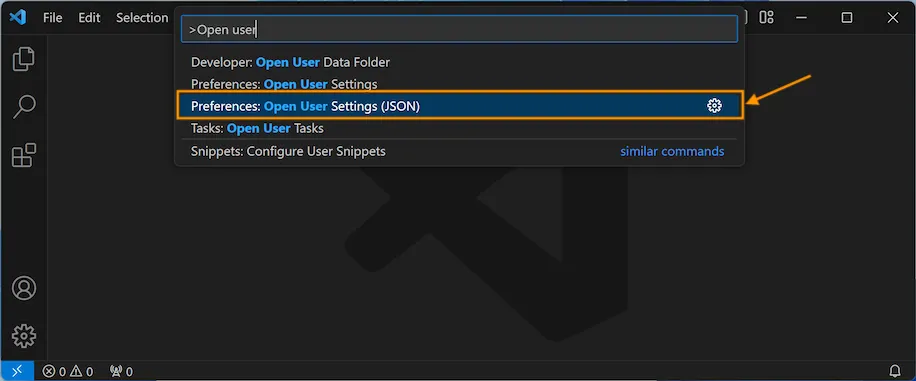 Image not subject to The Programmer’s Field Guide CC BY-NC-ND 4.0 License
This will open the settings.json file that you can now edit.
-
Create a new line just before the last closing curly brace
}at the end of the file, and then copy and paste the text below into that line:"terminal.integrated.profiles.windows": {"PowerShell": {"source": "PowerShell","icon": "terminal-powershell"},"Command Prompt": {"path": ["${env:windir}\\Sysnative\\cmd.exe","${env:windir}\\System32\\cmd.exe"],"args": [],"icon": "terminal-cmd"},"MSYS2": {"path": "C:\\msys64\\usr\\bin\\bash.exe","args": ["--login","-i"],"env": {"MSYSTEM": "MINGW64","CHERE_INVOKING": "1"}}},"terminal.integrated.defaultProfile.windows": "MSYS2","terminal.integrated.env.windows": {"MSYSTEM": "MINGW64","CHERE_INVOKING": "1"},"C_Cpp.default.systemIncludePath": ["${default}","C:\\msys64\\mingw64\\bin\\**","C:\\msys64\\mingw64\\include\\**"],"files.autoSave": "afterDelay","editor.formatOnSave": true, -
Save the file for these changes to take effect.
-
Now you can open a new Terminal in VS Code with: Terminal > New Terminal (as shown below):
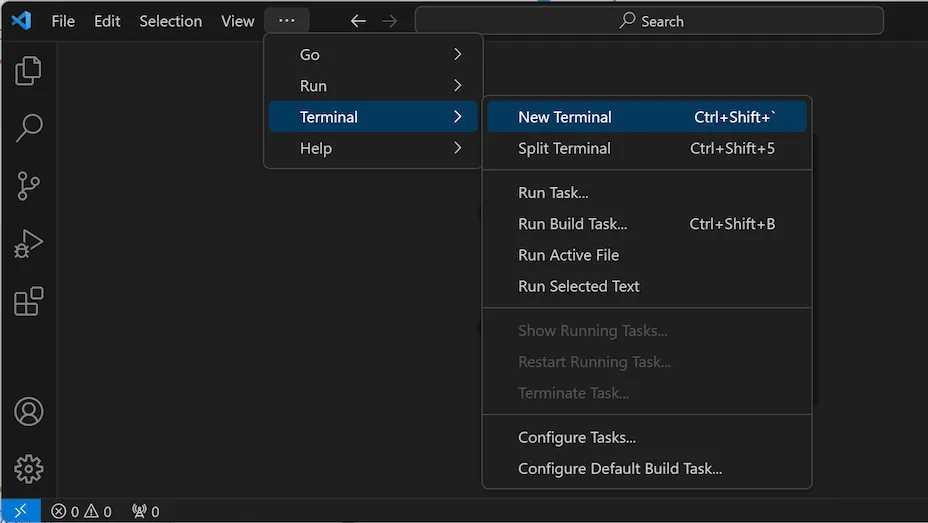 Image not subject to The Programmer’s Field Guide CC BY-NC-ND 4.0 License
 -
Install VS Code Extensions
The final step to complete the setup of VS Code is to install a few Extensions in VS Code:
Go to the page linked above, follow the steps to install both the C# and C/C++ recommended extensions, and then come back here and continue to the next step. You can use the “Back button” in your browser to return to this page.
5. Install Language Specific Tools
Some coding languages require specific tools/frameworks to be installed to be able to build and run your code files.
As you will be coding in C# and C++ in this book, let’s look at the tools needed for these languages:
C# Tools
For coding in C#, you will need to install the .NET SDK which will allow you to use the dotnet terminal command to create, build, and run your C# project code.
-
Download the latest version of the .NET SDK (currently .NET 9) for macOS from the official .NET website: dotnet.microsoft.com/download
-
Run the downloaded installer and follow on-screen instructions.
C/C++ Tools
For coding in C++, you will need to have a C++ compiler installed to build your C++ code into a file you can use to run your program. Commonly used C++ compilers are g++ and clang++, which can be installed with GCC (GNU Compiler Collection). You will also need to install GDB (GNU Debugger), which you can use when debugging C++ programs.
Your Windows machine is now set up with MSYS2, Visual Studio Code, and SplashKit, ready for C# and C++ development. Happy coding!
Using MSYS2
MSYS installs a minimal Linux environment on top of Windows. This will give you easy access to all of your Windows files and folder. The one challenge is that MSYS2 has its own home folder that does not map to your Windows home folder.
If you want to access your Windows home folder you will need to use the cd command to move into that folder. Each of your system drives (C: for example) is mapped to a folder with the drive name in the root of the file system. So C: is /c/ in MSYS. To access my Windows Documents folder, I can use the path /c/Users/andrew/Documents. You will need to change andrew to be your username, so the path will be in the format /c/Users/<username>/Documents. The following commands move to my Documents folder.
# Move to my C drivecd /c/
# Move to my Documents foldercd /c/Users/andrew/Documents
File Explorer
Using these commands you should be able to save your projects in a Code folder inside your Windows Documents folder for easy access.
You can also use the explorer.exe program to open a folder in the File Explorer.
# Move into my Documents foldercd /c/Users/`whoami`/Documents
# Open the current directory in File Explorerexplorer .